User Lookup routers allow you to assign to users who are already populated in a user lookup field on the record itself or on a related record.
Here are some common use cases for user lookup routers:
- Assigning Cases to the owner of the related Account.
- Assigning Leads to the owner of a matched Account (if a match is found).
- Assign a backup user to Leads based on the backup user listed on the Lead Owner’s user record.
Create New Router
Let’s step through the process of creating a user lookup router together:
- Navigate to the Kubaru application.
- Click the New Router button.
- Enter a name for your router (e.g., “Customer Support Cases”).
- Select the Object you want to assign (e.g., “Case”).
- Select the Field to Assign (e.g., “Owner”).
- (Optional) Update the Evaluation Order. See Prioritizing Your Router for more information.
- Click Create Router.
- Select “User Lookup” as the Assignment Method.
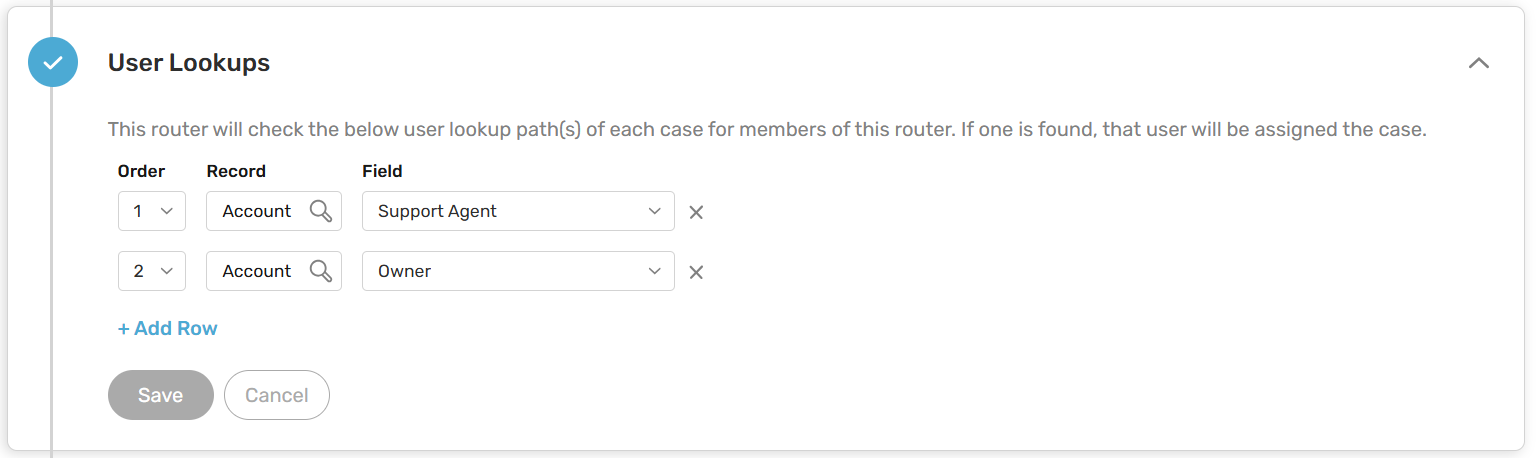
- Create a User Lookup by selecting a Record (e.g., “Account”) and Field (e.g., “Owner”) for the router to reference. The router will assign records to the same user found in the user lookup. You can create additional user lookups which will be evaluated if the previous user lookup field is blank.
- Connect a Queue. See the Connected Queues article for more information about creating and connecting queues.
- Add Filters. See the Adding Filters article for more information.
- Add Members. See Adding Members for more information.
- (Optional) Adjust the Additional Settings below.
| SETTINGS | DESCRIPTION |
|---|---|
| Overflow Behavior | Choose what should happen if there are no available members to receive assignments. See Overflow Behavior for more information. |
| Scheduling and Availability | The following settings can be configured to limit when assignments are made: Distribution Schedule: Select a distribution schedule to pause the router during non-working hours. See Distribution Schedules for more information. Assign During Off-Hours: Enable this if you want to use the distribution schedule as an SLA constraint without restricting when the router makes assignments. Holiday Schedule: Select a holiday schedule if you want to pause the router on holidays. See Holiday Schedules for more information. Assign During Holidays: Enable this if you want to use the holiday schedule as an SLA constraint while still assigning records on holidays. Assign Outside Member Schedules: Enable this if you want to use the member’s schedule as an SLA constraint without restricting when the member receives assignments. Assign During Member Holidays: Enable this if you want to use the member’s holiday schedule as an SLA constraint while still assigning records on holidays. Assign When Unavailable: Enable this if you want to assign records to router members even if their status is “Unavailable”. See Toggling User Availability for more information. Assign When Out Of Office: Enable this if you want to assign records to router members even if they are out of the office. See Out Of Office Schedules for more information. Must Be Logged Into Salesforce: Enable this to pause router members who are signed out of Salesforce or idle. See Must Be Logged Into Salesforce for more information. Pause During Phone Calls: Enable this to pause assignments to router members while they’re on a call. See Pause During Phone Calls for more information. Pause During Calendar Events: Enable this to pause assignments to router members whose Salesforce calendar indicates they’re unavailable. See Pause During Calendar Events for more information. |
| SLA Actions | The following SLA Actions can be enabled: Send Email Notification: Enable this to notify one or more users if records go unworked for a specified duration. See Unworked Record Notifications for more information. Reassign Record: Enable this to reassign unworked records after a specified duration. See Reassignment for more information. Track Response Time: Enable this to measure how long it takes router members to respond to assignments. See Tracking Response Time for more information. |
| Notifications | Configure the types of notifications that are sent when assignments are made. See Assignment Notifications for more information. |
| Matching | Enable matching to ensure similar records are assigned to the same user. See Assignment Matching for more information. |
| Field Updates | Configure one or more fields to be updated when a record is assigned. See Field Updates for more information. |
- Click the Activate button to activate your router. See Assignment Preview to learn how to check which records will be assigned before activating your router.
Things to keep in mind