Managing Users
Adding Users
Note
Router members will automatically be added to Kubaru as users with the role of “Member” unless you’ve enabled Only Admins Can Provision Licenses.
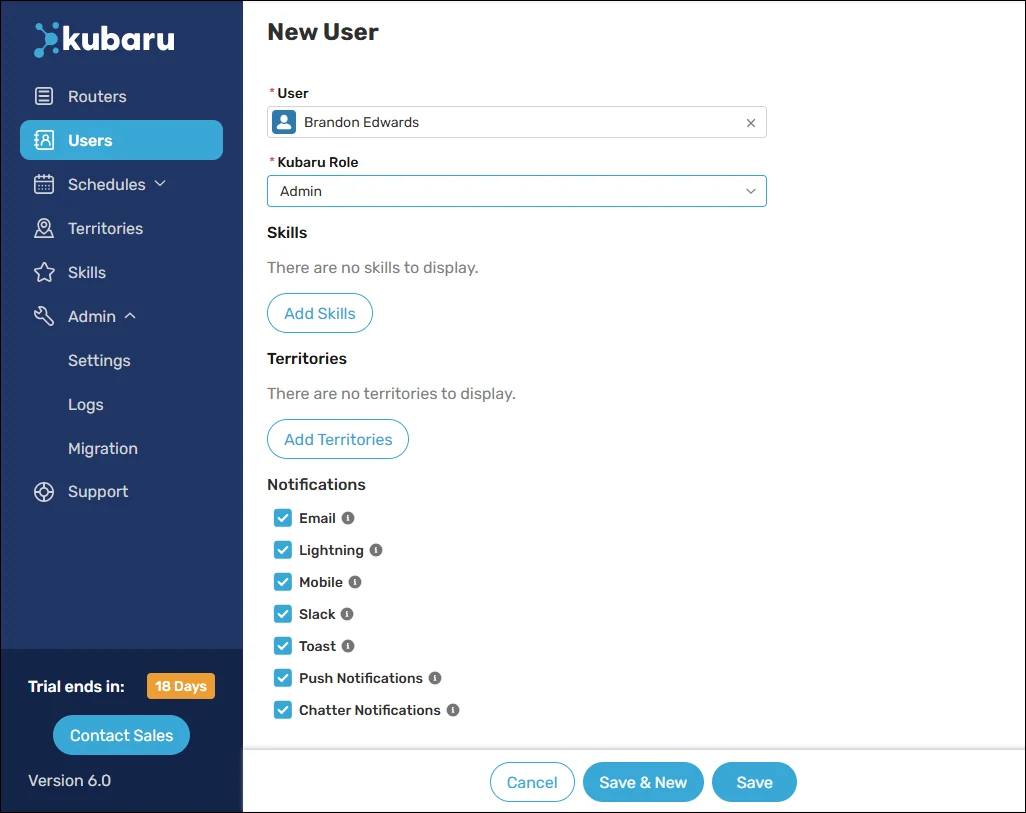
Follow these steps to add one or more users:
Select Kubaru from the App Launcher menu.
Click the Users tab in the navigation menu.
Click the Add User button.
Select the User you’d like to add to Kubaru.
Select the Kubaru Role the user should be assigned. See the User Roles section below for more details.
(Optional) Click Add Skills to assign one or more skills to the user. See Creating Skills for more information.
(Optional) Click Add Territories to assign one or more territories to the user. See Creating Territories for more information.
(Optional) Select which Notifications the user should receive for assignments. See Assignment Notifications for more information.
Click Save.
User Roles
Permissions will automatically be provisioned to users based on the role they are assigned.
| ACCESS | MEMBER | READ ONLY | MANAGER | ADMIN |
|---|---|---|---|---|
| Receive assignments |  | | | |
| Use Kubaru Utility | | | | |
| Manage routers | No | Read Only | Read Only | |
| Manage router members | No | Read Only | | |
| Manage schedules | No | Read Only | No | |
| Manage holidays | No | Read Only | No | |
| Manage OOO | No | Read Only | | |
| Manage skills | No | Read Only | | |
| Manage territories | No | Read Only | No | |
| View assignment logs | No | Read Only | | |
| Add/remove users | No | No | No | |
| Manage users | No | Read Only | Limited (managers cannot edit user roles or territories) | |
| Use migrator | No | No | No | |
| Manage admin settings | No | No | No | |
Monitoring License Usage
Each active user in Kubaru is automatically provisioned a license. You can monitor your license usage from the users page:

See Adding and Removing Licenses for instructions on how to purchase additional licenses.
Deactivating Users
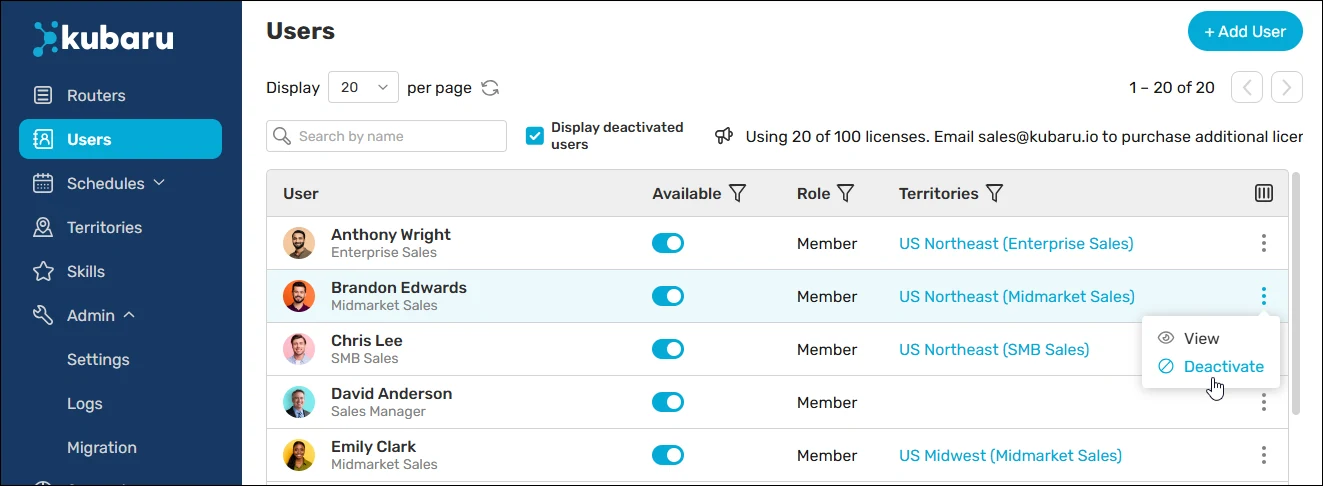
You can deactivate a user to remove their license by following these steps:
Select Kubaru from the App Launcher menu.
Click the Users tab in the navigation menu.
Click the Action Menu icon for the user you want to remove and select Deactivate.
Click the OK button.
Keep in mind
Deactivated users are not assigned a license in Kubaru.
Deactivated users will not receive assignments and will automatically be removed from all routers.
You can check the Display deactivated users checkbox to display deactivated users in the table.
You can reactivate a deactivated user by selecting Reactivate from the Action Menu.
Users that are deactivated in Salesforce will automatically be removed from Kubaru.
Deleting Users
Recommended
Deleted users may be re-added to Kubaru based on your member sync settings. To prevent users from being added again, we recommend leaving them deactivated rather than deleting them.
You can delete deactivated users to remove all data associated with them from Kubaru. Follow these steps to do so:
Select Kubaru from the App Launcher menu.
Click the Users tab in the navigation menu.
Check the Display deactivated users checkbox.
Click the Action Menu icon for the user you want to remove and select Delete.
Click OK.