















Quick Summary
Salesforce escalation rules reassign cases or send alerts when cases stay open too long. Setup takes six steps, from preparing resources and rule entries to setting the clock and testing. Kubaru runs multiple SLAs per record with richer escalation actions.
Why Open Cases Need an Automatic Escalation Path
According to Salesforce’s State of Service report, 77% of customers expect to interact with someone immediately when they contact a company.
A further 88% say good service makes them more likely to buy again, so a slow reply can cost you the next sale.
You need a way to catch support cases before customers are left waiting too long. Salesforce’s built-in answer is escalation rules, included in every Service Cloud edition. They handle simple escalation paths well and hit firm limits beyond that.
How do they work, how do you set one up, and what do you do once you outgrow them?
Why Listen to Us?
More than 100 companies, including Ooma, Conga, and The Loan Store, use Kubaru to assign Salesforce records. For example, Exclaimer uses Kubaru to route cases, opportunities, and tasks, automatically reassigning unworked cases.
We added SLA management after watching those teams hit the limits of native escalation tools. The guide below draws on that experience.
What Are Salesforce Escalation Rules?
Salesforce escalation rules automatically escalate cases that match criteria you define and remain open beyond a set time. They can reassign a case to another user or Tier 2 queue, and send email alerts to the relevant people.
You can have only one active escalation rule at a time, but it can contain multiple entries. Each rule has three moving parts.
1. Rule entries
A rule entry is the set of criteria a case has to match before it can escalate, written as field filters or a formula. Salesforce checks entries in sort order and stops at the first match, so order matters.
2. Business hours
Business hours tell Salesforce when your team is working, and you choose on each rule entry whether to use them. If you do, escalation actions only happen during those hours, and they don’t run on any holidays you’ve added.
If you select Ignore business hours, the escalation timing can include hours outside the support schedule.
3. Escalation actions
Escalation actions control what happens in sequence once a case is old enough. You can add up to five per rule entry, each firing at a different time threshold.
For example, you could email the owner after 2 hours, alert a manager after 4 hours, and reassign the case to a Tier 2 queue after 8 hours.
How To Set Up Salesforce Escalation Rules
You’ll need the Customize Application permission to create or edit escalation rules, then work through these six steps in order.
1. Prepare business hours, queues, and email templates
Before creating your escalation rule, prepare the resources it may need from Setup:
- Business hours: In Setup, search for Business Hours and click New Business Hours. Set the time zone and daily hours, then add any holidays and save.
- Queues: Create a case queue, such as Tier 2 Support, if escalated cases need to go to a team
- Email templates: Write a short template that names the case and why it escalated. Salesforce won’t send an email notification without one.
Set business hours up front. If a rule entry is set to ignore business hours, its timer runs 24/7 and a case can escalate overnight or on a weekend.
2. Create the escalation rule
In Setup, search for Escalation Rules in the Quick Find box and select it. Click New, enter a descriptive name (like “Standard Support Escalation”), check the box to make it active, and click Save.
Only one escalation rule can be active at a time. If you’re replacing an old rule, review its entries first so you don’t lose a path you still need.
3. Add rule entries in priority order
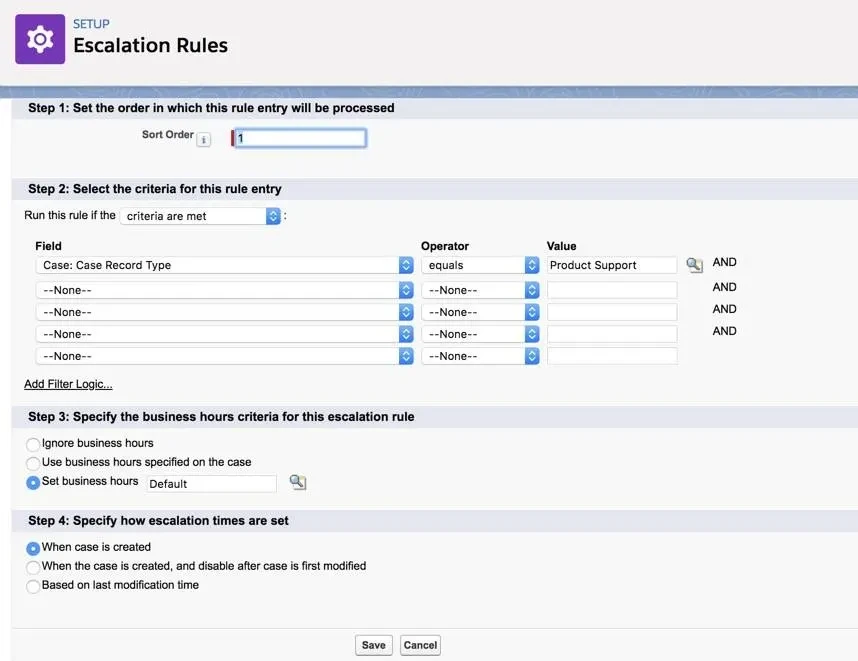
Open your rule and click New under Rule Entries. Set the sort order, then define the criteria that trigger escalation. For example, your first entry might target high-priority phone cases, while a second entry catches all remaining cases.
Put specific entries first. A broad, catch-all entry at the top can prevent more specific entries below it from running.
4. Choose business hours and when the timer starts
On the same entry, choose how business hours apply. You can ignore them, use the business hours specified on the case, or select a specific set.
Next, choose when the Age Over clock, the wait time you set on each escalation action, starts:
- When case is created: The Age Over timer starts when the case is created and continues regardless of edits
- When case is created, and disable after case is first modified: The timer starts at creation, but stops if someone modifies the case before the escalation threshold
- Based on last modification time: The timer restarts every time someone edits the case
Say your Age Over threshold is 5 hours and a case comes in at 8 a.m. With the first option, it escalates at 1 p.m.
With the second, an edit at 9 a.m. stops escalation altogether. With the third, that 9 a.m. edit resets the timer, so the case escalates at 2 p.m. if no one modifies it again.
The best choice depends on what counts as progress for your team. If any edit means someone’s on it, go with last modification time. If closing the case is what matters most, use the first option.
5. Add escalation actions
After you save the entry, Salesforce opens the Escalation Actions page. Click New and fill in the fields:
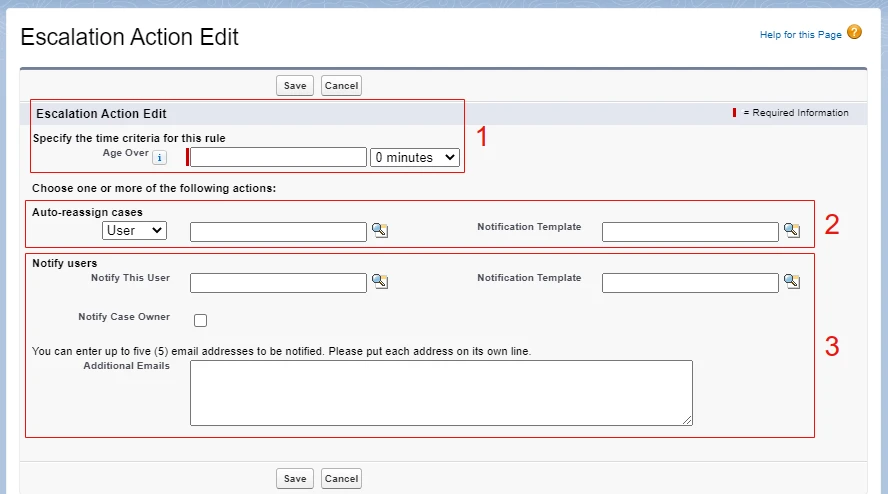
- Age Over: How long a case can sit before the action fires, in whole hours plus 0 or 30 minutes. Each action in an entry needs a different value.
- Auto-Reassign Cases: The user or queue that becomes the new owner, plus an email template to notify them.
- Notify This User and Notify Case Owner: Who gets an email when the case escalates.
- Additional Emails: Up to five more addresses you would like to notify, one per line.
Save it, then add up to four more escalation actions. Space them out so each owner has a fair chance to respond before the next step kicks in.
6. Test the rule and monitor the escalation queue
Create a test case that matches the rule entry you want to check, then search Setup for Case Escalations in the Quick Find box to view pending actions. The Escalate At column shows exactly when each pending action will fire.
An admin can delete pending actions from the escalation queue if a case no longer needs to escalate.
Limitations of Salesforce Escalation Rules
Escalation rules work well for a simple path, but as your SLAs get more detailed, you’ll run into these six limits.
1. They only work on cases
Escalation rules are a case feature, so they won’t cover your leads or custom objects. If you promise a 5-minute response on inbound leads, you’ll need a Flow, Apex, or another tool to enforce it.
2. Each case gets one escalation timeline
Each case is escalated under the first rule entry it matches, using the configured creation or last-modification time to calculate its escalation threshold. The case must remain open for the escalation action to run.
Although escalation rules can evaluate case fields and formulas, they don’t provide separate first-response and resolution milestones. Salesforce Entitlements and Milestones can track both on supported cases and work orders, but require separate setup.
3. Actions stop at reassigning and emailing
An escalation action can reassign a case, send emails, and tick the Escalated checkbox. It can’t update any other field, post in Slack or Microsoft Teams, or create a task.
Each of those needs a separate Flow, which means maintaining two automations for one escalation.
4. Reassignment ignores user availability
A reassigned case goes to one fixed user or queue, and the rule never checks whether that person is off shift or already buried in cases.
Native case assignment tools share the same gap, so an escalated case can end up with someone who can’t work it either.
5. Changes require an admin
Only someone with Customize Application, an admin-level permission, can create or edit escalation rules, so a support manager who wants to change a threshold usually has to ask an admin and wait.
6. Reps can’t see the clock
Salesforce doesn’t show reps a countdown of how long they have before a case escalates. Admins can only check pending actions in Setup under Case Escalations; the Escalate At column shows when each action is scheduled to run.
How Kubaru Extends Salesforce Escalation Rules
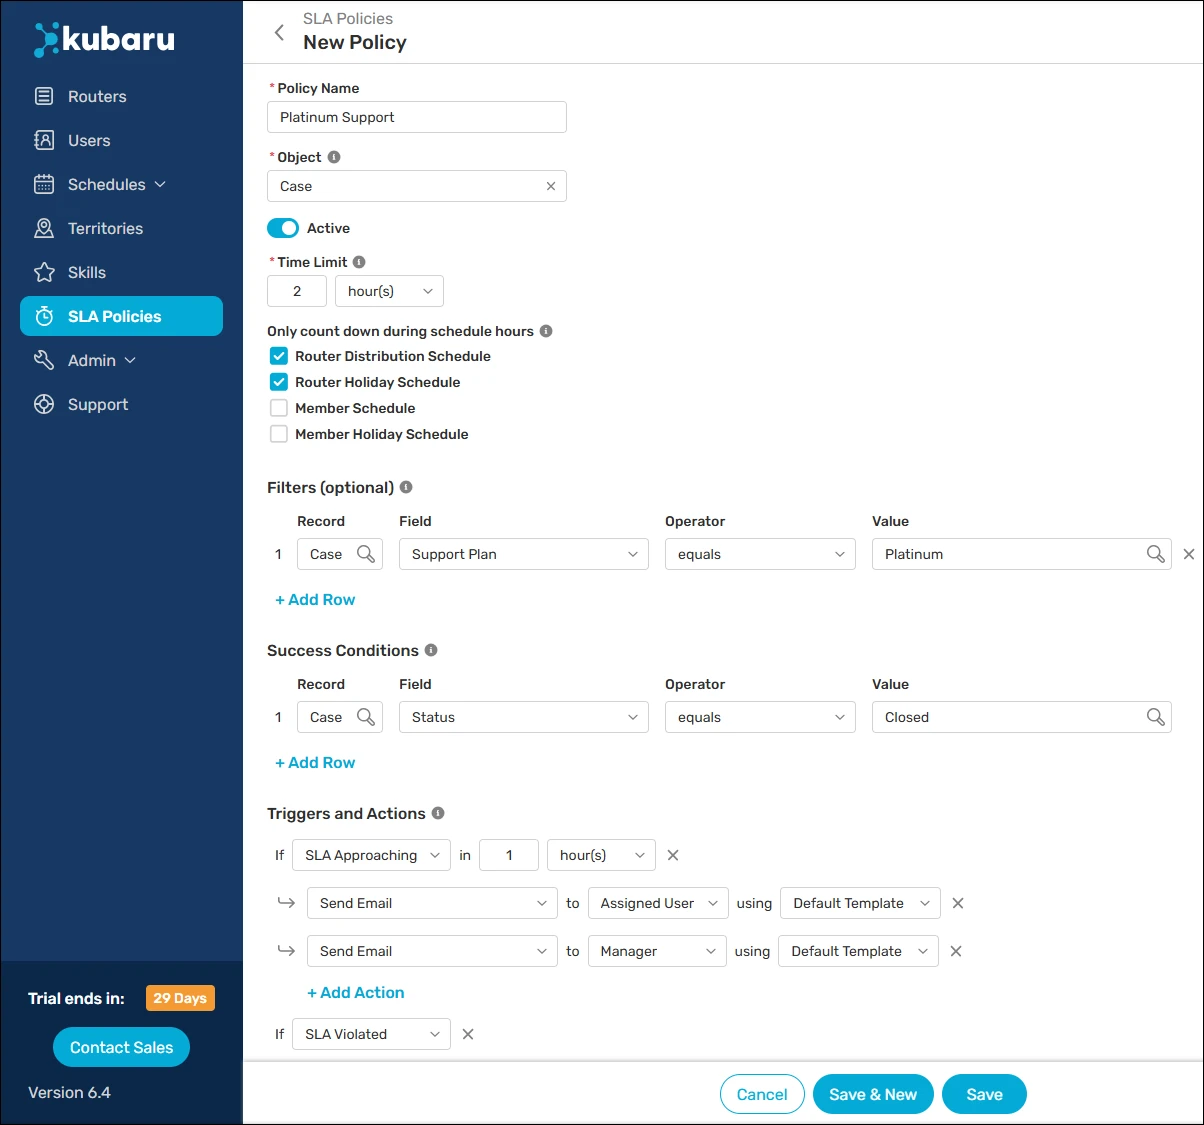
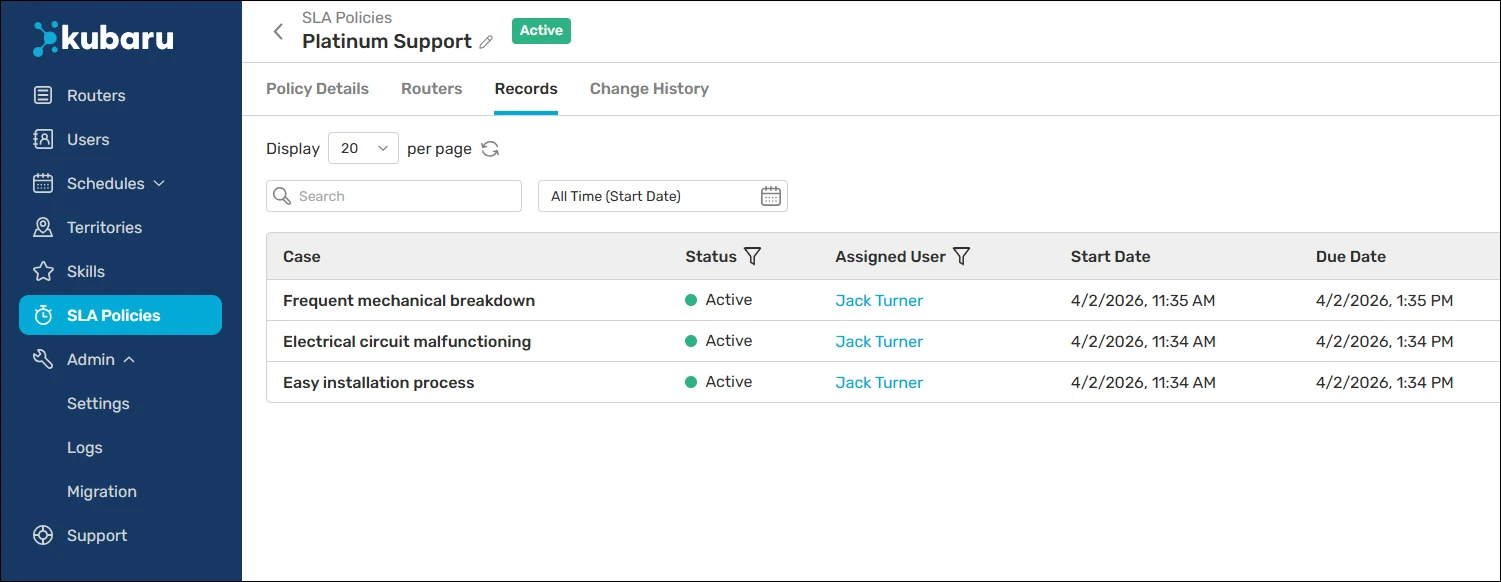
Kubaru is a native Salesforce app that automates lead, case, and record assignment. Kubaru’s Salesforce SLA management, currently in beta, picks up where native escalation rules leave off.
Create SLA policies in Kubaru and attach them to your routers. Every record assigned through those routers receives the policy’s timers and configuration. There’s no code involved, and business users can manage policies without a Salesforce admin.
Kubaru extends native escalation rules in four key ways.
1. Multiple SLAs on one record
A single case can have three clocks running at once, such as first response, escalation handoff, and final resolution. You attach a separate SLA policy for each, and they run independently.
Each policy gets its own time limit, filters for which records it covers, and success conditions, such as Status equals Resolved. With context schedules, the SLA timer can pause outside working hours and during holidays.
2. Escalation actions that do more than send an email
Each policy can trigger actions when an SLA becomes active, approaches its deadline, is violated, or is met. You can choose from these actions:
- Notifications: Alert the record owner or a manager by email, Slack, or Microsoft Teams
- Field updates: Change a Salesforce field, such as setting Priority to Critical on a violation
- Reassignment: Move a breached record back to its original queue, another queue, or a specific user
- Pausing assignments: Mark the assigned rep as unavailable so they stop getting new records while they catch up
- Tasks: Create a Salesforce task for the record owner, their manager, or another user
You can stack multiple actions on one trigger, too. A breached case can be reassigned and bumped to Critical while its manager gets a Slack alert.
3. SLAs on any Salesforce object
You can configure Kubaru’s SLA policies to work on any Salesforce object, including leads, opportunities, accounts, tasks, and custom objects. That means one tool can enforce a 5-minute response on new leads and a 4-hour resolution target on urgent cases.
4. The SLA panel on every record
Add the Kubaru SLA Panel to your Salesforce record pages and reps see every SLA on the record they’re working, with a countdown for each.
Clicking a policy opens the full SLA record with its start and due dates, time remaining, and upcoming actions.
Managers can monitor SLA performance across records in the centralized SLA Record Table, and assignment logs show the policies associated with each record.
FAQs
What’s the difference between assignment rules and escalation rules in Salesforce?
Assignment rules decide who owns a case when it’s saved, and escalation rules step in later if the case stays open too long. On save, Salesforce runs assignment rules first and escalation rules last.
Should I use escalation rules or entitlements and milestones?
Use escalation rules when one simple, time-based escalation path on cases is enough. Use entitlements and milestones when you need explicit targets, such as first response and resolution time, or service levels with their own warning and violation actions.
They take more setup, but they’re worth it once you’ve outgrown one timeline per case.
Why isn’t my Salesforce escalation rule firing?
An escalation rule won’t fire if it isn’t active, or if the case matches an earlier entry first. The case must remain open until the configured threshold.
If the entry uses business hours, escalation waits for the next working window. Cases accepted through Omni-Channel won’t trigger escalation rules until someone edits and saves them.
What are the limits on Salesforce escalation rules?
Each escalation rule can hold up to 3,000 rule entries, 300 of which can use formula criteria. Each entry allows 25 filter criteria and five actions, and a rule can have 200 actions in total.
When To Move Past Native Escalation Rules
If you only need one escalation path for cases, native escalation rules will do the job, and they’re already in your Salesforce org. Build one rule with entries ordered from most to least specific, then test it.
Separate first-response and resolution clocks, SLAs on other objects, or actions beyond email all need more than native rules. Under a $20/user/month pricing plan, Kubaru’s SLA management covers those capabilities and business users can manage policies without admins.
Book a demo or start a free 30-day trial to try Kubaru on your own records.