















Quick Summary
Setting up Salesforce Web-to-Lead takes six steps. You prepare lead fields and an owner, turn on the feature, generate the form, embed its HTML, enable auto-replies, and test submissions.
Capturing leads doesn’t guarantee fast follow-up, though. Kubaru closes this gap with automated assignment, availability-aware routing, and response time tracking.
What Happens After Someone Fills in Your Form
When Harvard Business Review researchers audited 2,241 US companies, 23% never responded to a web-generated test lead. The ones that did reply took 42 hours on average, and that’s a long wait.
In the same study, an analysis of 1.25 million sales leads found that firms attempting contact within an hour were nearly seven times as likely to qualify a lead as firms that waited an hour longer.
That’s the gap. Creating the lead doesn’t guarantee that a rep will follow up promptly.
How do you set up a Salesforce Web-to-Lead form, and how can you optimize assignment rules so each new lead gets to the right rep quickly?
Why Listen to Us?
More than 15,000 users route Salesforce records through Kubaru. We help teams overcome the limits of native assignment rules and get web leads to the right rep before they go cold.
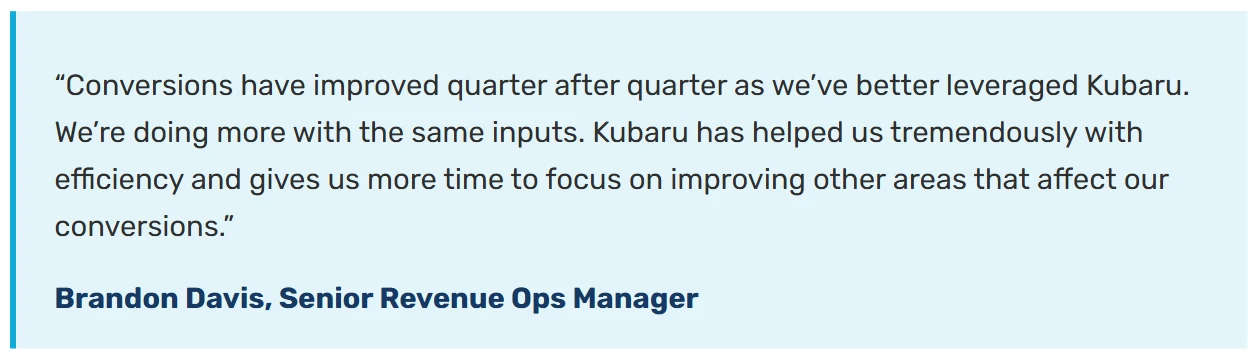
Ooma used Kubaru to automate lead assignment, reduce average response times to under five minutes, and increase lead conversions by more than 10%.
What Is Salesforce Web-to-Lead?
Salesforce Web-to-Lead is a built-in feature that captures information from a form on your website and creates lead records in your CRM.
You choose the fields you want on the form, Salesforce generates the HTML, and your web team embeds it onto a page.
Web-to-Lead is available in all Salesforce editions, in both Lightning Experience and Salesforce Classic.
How to Set Up Web-to-Lead in Salesforce
1. Get your lead fields and default owner ready
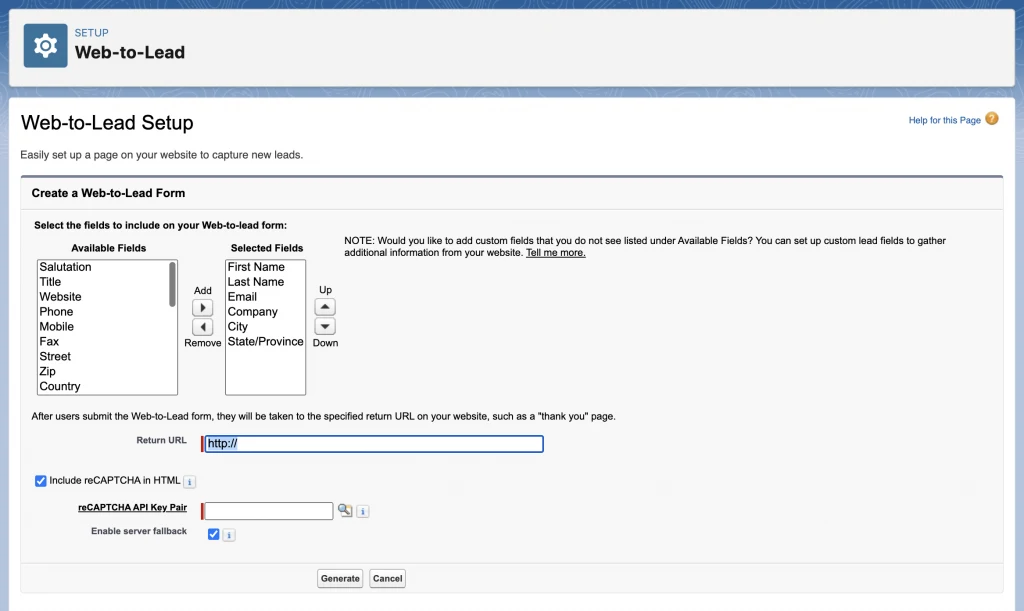
Create any custom lead fields you need in Salesforce before generating your Web-to-Lead form. For example, add a Product Interest picklist if you want leads to select which product they’re interested in.
Salesforce won’t create the lead record if a universally required field is missing from the form. Ensure your form includes Last Name, Company, and any required custom fields in your organization.
Next, choose a default lead owner in Lead Settings. This person gets every web lead that no assignment rule picks up, so pick someone who works in Salesforce daily. Tick Notify Default Lead Owner so they get alerted.
2. Turn on Web-to-Lead and pick a default lead creator
From Setup, type “Web-to-Lead” in the Quick Find box, select it, and click Edit to turn it on and set the three options below.
- Require reCAPTCHA Verification: It’s on by default, and it’s worth leaving on.
- Default Lead Creator: A user with the Modify All Data, Send Email, and Access Activities permissions, all from one permission set or one profile.
- Default Response Template: The email prospects get when no auto-response rule applies to their submission.
Note: Salesforce notifies the default lead creator whenever a submission fails, or you hit the daily limit, so pick someone who checks their inbox.
3. Generate the form HTML
Back on the Web-to-Lead page, click Create Web-to-Lead Form and pick the fields visitors will fill in. For a demo form, you’ll usually only need name, email, company, and one qualifying question.
If you want Salesforce to associate submissions with a campaign, include its Campaign ID and a valid member status in the form. Next, choose the label language and enter a return URL. That’s the thank-you page visitors see.
When reCAPTCHA is enabled, select Include reCAPTCHA in HTML, pick your reCAPTCHA API key pair, and click Generate. Save a copy of the code, because you can’t pull it up in Salesforce later to make edits.
4. Add the form to your site and tighten it up
Hand the HTML to whoever runs your website. On WordPress, for example, you can paste it straight into a Custom HTML block and style it with CSS.
While the code’s open, add a hidden Lead Source field, because Salesforce won’t tell you which form a lead came from. Give each form its own value, like “Website Demo Request”, so you can compare them in reports.
Add browser-side checks to catch obvious mistakes before submission. For example, use type="email" to check email formatting and the required attribute for fields visitors must complete.
Also, configure Salesforce validation rules to block saves for invalid data. It’s worth it, because a submission that fails a validation rule won’t create a record. If the visitor still gets your thank-you page, they’ll think it worked.
5. Send an automatic reply with an auto-response rule
A quick confirmation email tells prospects their request arrived and explains what’s next. Lead auto-response rules send these emails, using templates you choose.
In Setup, search for Auto-Response Rules, and open Lead Auto-Response Rules. Create and activate your rule with the appropriate entries.
Salesforce checks rule entries in order and sends the template for the first matching entry. If none match, it’ll use the Default Response Template from step 2.
Only one lead auto-response rule can be active at a time, so configure its entries to cover different kinds of requests. For example, demo requests might receive a booking link, while newsletter signups get a welcome note.
6. Test with debug mode, then a live lead
The generated HTML includes two commented-out lines named debug and debugEmail. To debug your Salesforce Web-to-Lead form, uncomment both fields by removing their <!-- and --> markers.

Replace the placeholder in debugEmail with your email address. When you submit the form, Salesforce will email you a debugging report to help identify any issues.
Next, submit a live test lead using unique details (e.g., a unique company email) to reduce the chance of duplicate detection. Verify each of these in the resulting record:
- Every field shows up in the right place
- Lead Source has the value you set
- The owner is who you expected
- The auto-reply reached your inbox
Re-comment the debugging fields to turn off debug mode before launching the form publicly.
Salesforce Web-to-Lead Limitations to Plan Around
Four limits decide whether a native form is enough for your team.
1. A daily cap of 500 leads
Salesforce accepts up to 500 form submissions per 24-hour period. Excess requests enter a pending queue and are processed after the daily limit resets at midnight UTC. Support can raise the limit temporarily if you expect a spike.
Note: The pending queue is shared with Web-to-Case and holds up to 50,000 requests. Once it fills, Salesforce rejects new submissions, and they are permanently lost. Salesforce only emails the administrator about the first five rejected submissions.
2. No file uploads
You can’t collect an RFP or any other file attachment through native Web-to-Lead forms; you’ll need a custom form or integration that supports them. Customers asked for attachments back in 2008, and that idea is still open.
3. Spam and validation rules
reCAPTCHA helps keep spambots out, and it’s on by default. Validation rules can block submissions that match known spam patterns, but you have to write them.
Salesforce also emails the default lead creator for each blocked submission, which can mean a flood of alerts during an attack.
4. Only one active assignment rule
Salesforce can assign leads to different users or queues using multiple entries in an assignment rule, but only one rule can be active at a time. Leads that don’t match any entries go to the default lead owner.
For more advanced, criteria-based routing that accounts for rep availability and workloads, you’ll need additional automation or a dedicated routing tool.
What Should Happen After a Web Lead Is Created?
Once the lead exists, the clock starts ticking, and a good setup has five jobs to do in the first few minutes.
- Assign a specific rep as the owner
- Alert that rep by email or an in-app notification
- Confirm receipt with the prospect
- Measure time to first contact, so you know how fast your team is
- Reassign the lead if nobody works it in time
Assignment rules cover the first two, and auto-response rules cover the third. Neither one tracks lead response time or pulls back a lead that a rep hasn’t touched.
How To Assign Web Leads Automatically in Salesforce
You have three ways to decide who gets each web lead, and they work well together.
| How the owner is chosen | Round robin | Rep availability check | Response time tracking | |
|---|---|---|---|---|
| Lead assignment rules | First entry whose criteria match the lead’s fields | Only with a formula workaround | No | No |
| Lead queues | Reps take leads from a shared list | No | No | No |
| Kubaru | Routers assign leads from a connected queue | Even or weighted | Yes, using schedules, time off, and idle status | Yes, with automatic reassignment |

1. Lead assignment rules
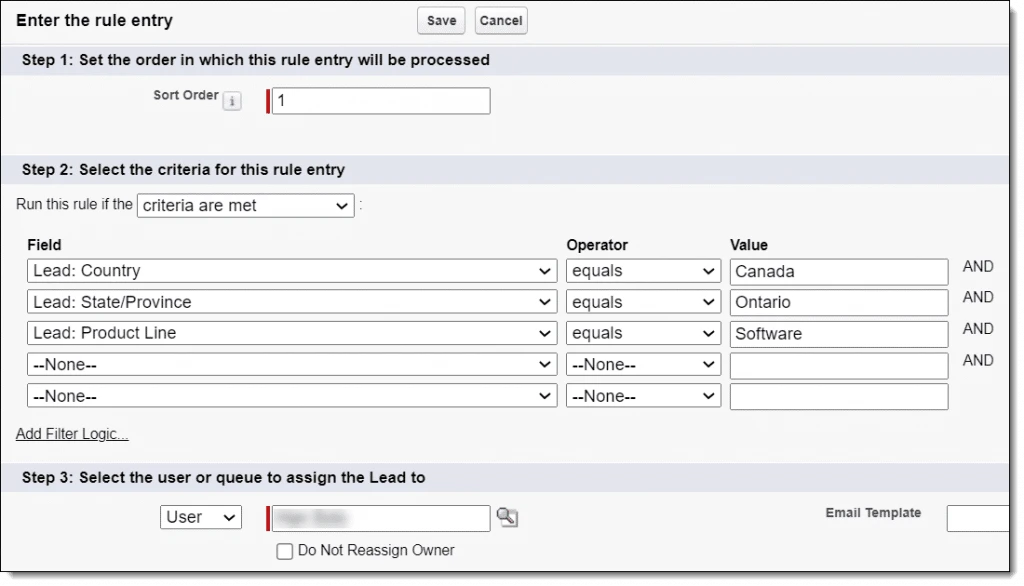
A native lead assignment rule is a list of entries that Salesforce checks from top to bottom. The first entry whose criteria match decides the owner, which can be a user or a queue.
Each rule holds up to 3,000 entries with 25 filter criteria each, but only one lead rule can be active.
Assignment rules work well for territory management or other fixed criteria, like company size. Before you set up Salesforce assignment rules, you should know their limitations.
For example, one entry might send Canadian leads to your Canadian rep. Another might send leads with 1,000+ employees to your enterprise team. However, these rules can’t tell when your Canadian rep is on vacation or swamped.
You can build a basic round-robin system using an auto-number field, a formula, and assignment-rule entries, but it requires extra setup.
2. Lead queues
A lead queue is a shared list of leads that a group of reps can work from. Your assignment rule sends leads in, and they stay there until someone takes ownership.
Reps can claim leads from a queue list view, and you can configure email notifications to notify members of new leads.
Queues work well when any rep can handle any lead, but they don’t support workload balancing. Reps choose which leads to take, and the queue doesn’t enforce a response deadline if reps delay.
Salesforce Omni-Channel can also push supported work to available reps, but only in its Enhanced version, and availability depends on your license and configuration.
3. A routing tool like Kubaru
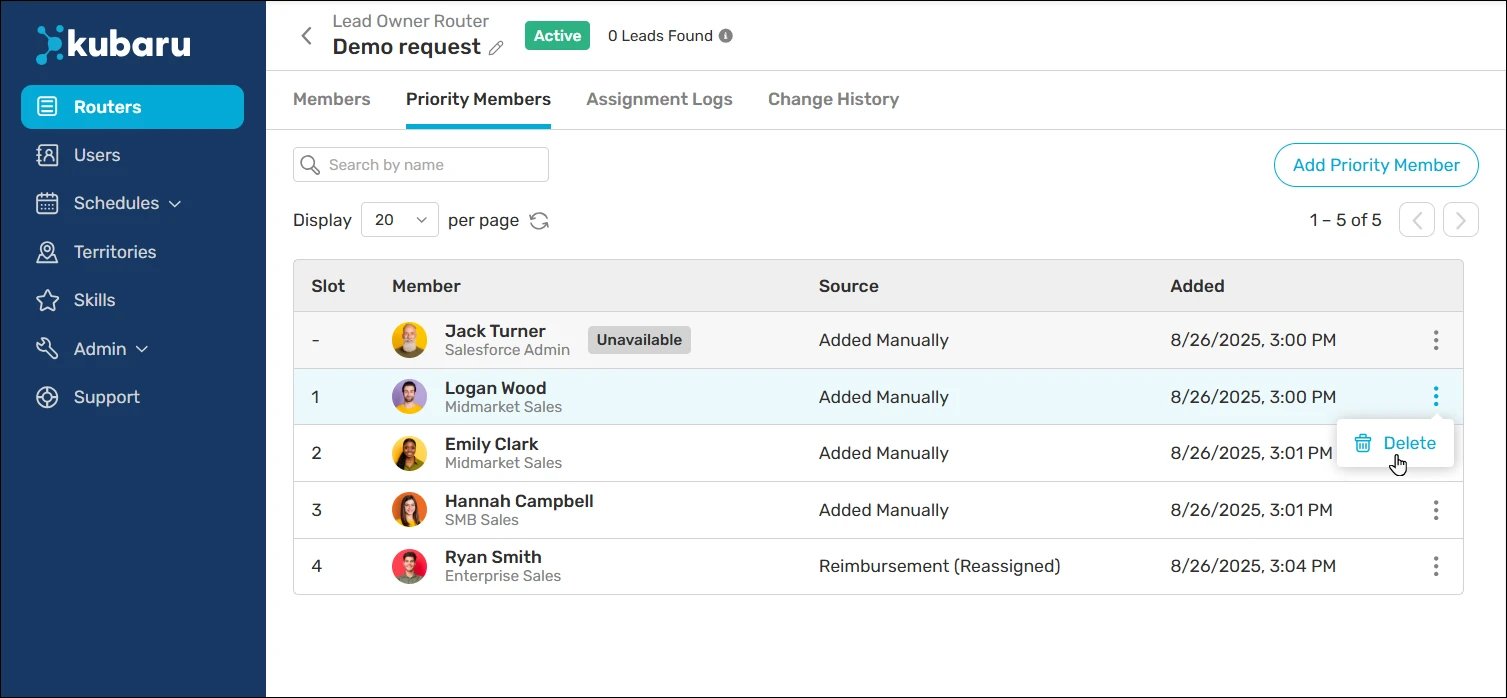
Kubaru is a native Salesforce app that automates assignment for leads, cases, and other records. Your assignment rule sends web leads to a queue connected to a Kubaru router, which assigns most eligible records in seconds.
Kubaru’s Salesforce lead routing software also adds three features native rules don’t offer out of the box.
- Round robin: Kubaru distributes leads evenly or by weight, so a rep weighted 2 receives twice as many leads as one weighted 1. Each rep can also be capped by hour, day, or week.
- Availability-aware assignment: Set each rep’s working hours, time zone, holidays, and out-of-office periods. You can also pause reps who go idle in Salesforce, so leads go only to available people.
- Response time tracking: Kubaru records how long each rep takes to respond, using events you define, such as a status change or outbound email. If nobody works a lead in time, Kubaru reassigns it automatically.
Response times show up in Salesforce reports and dashboards, so managers can see who needs help. Your sales ops team doesn’t have to wait on a Salesforce admin to change these settings.
FAQs
Can you have multiple Web-to-Lead forms in Salesforce?
Yes. Create separate forms for demo requests, newsletter signups, or contact inquiries. Every form shares the same 500-per-day limit, and each submission creates a lead. Give each form a hidden Lead Source value to tell them apart.
Does Salesforce Web-to-Lead create duplicate leads?
Yes. Each submission creates a new lead, even for existing contacts, unless a duplicate rule steps in. Rules set to Block or Allow and Alert block matching submissions, so exclude the default lead creator from them.
Can you edit a Web-to-Lead form after you create it?
Not inside Salesforce, no. Salesforce doesn’t support viewing or editing a Web-to-Lead form once it’s generated. To make changes, edit the HTML on your website or generate a new form.
What’s the difference between Web-to-Lead and Web-to-Case?
Web-to-Lead captures sales leads, while Web-to-Case creates support cases. Web-to-Case has a higher daily limit of 5,000 cases, but both share a 50,000-request pending queue. A spike in either one can fill the queue for both.
Get Every Web Lead To the Right Rep, Fast
Salesforce Web-to-Lead captures prospect information, but native assignment rules and queues can’t guarantee that every lead reaches the right rep in time. Your sales team spends time managing distribution instead of following up, missing speed-to-lead targets.
Kubaru speeds up lead follow-up, and customers report 10%+ higher conversions. It routes leads based on rep availability and workload, with response time tracking so untouched leads get reassigned automatically.
Start a free 30-day trial or book a demo to see how Kubaru works with your Salesforce setup.