















Quick Summary
Salesforce queues help teams manage shared workloads, but creating one doesn’t guarantee records reach the right person promptly. Learn to set up queues, configure lead and case assignment rules, and test your setup. Discover how automated routing can reduce delays, balance workloads, and prevent records from sitting unclaimed in queues.
Why a Queue Is Only Half of Your Routing
In a 2011 Harvard Business Review study of 1.25 million leads, firms that tried to contact a lead within an hour were nearly seven times as likely to qualify it as firms that tried even an hour later. Yet in many Salesforce orgs, new leads enter a queue before an individual rep takes ownership, and support cases can follow a similar pattern.
Queues are quick to set up and useful for sharing work. But the queue owns each record until it’s assigned to a rep, so records can sit there and grow cold without an individual owner.
This guide covers how to set up Salesforce queues and how to keep queued records moving with automated lead routing.
Why Listen to Us?
Since 2016, we’ve helped Salesforce teams assign leads, cases, and other records automatically. Kubaru routers pull records directly from Salesforce queues, helping teams move from shared queues to individual assignments.
Today, more than 15,000 users route their work through Kubaru, which has a 5.0 rating from more than 150 reviews on the Salesforce AppExchange. For example, Conga automated the assignment of over 200,000 leads with us and increased its speed-to-lead by 40%.
What Is a Salesforce Queue?
A Salesforce queue is a shared holding area where records wait until they’re assigned to someone on a team. While a record’s waiting, the queue owns it, so you’ll see the queue’s name in the Owner field. Salesforce describes queues as a way to “prioritize, distribute, and assign records to teams who share workloads.”
You can use queues for leads, cases, tasks, and custom objects, along with other supported objects such as orders, contact requests, service contracts, and knowledge article versions. Most queues get their own list view, where members check what’s waiting and pick up records.
A queue doesn’t decide what goes into it. For leads and cases, that’s usually the job of assignment rules, though Flows and other automation can send records to a queue too. You can also add a record to a queue manually by changing its owner.
How to Set Up Salesforce Queues
1. Decide What Each Queue Is For
A queue works best when anyone in it can take any incoming record. So build each queue around one team and one type of work. Think of an “EMEA Inbound Leads” queue for European SDRs, or a “Tier 2 Support” queue for senior agents.
Try not to build one giant “All Leads” queue. When too many records and reps share a queue, it becomes harder to track follow-up and spot unclaimed records. Clear ownership rules and automatic distribution can help reduce delays and cherry-picking.
2. Create the Queue and Choose Its Objects
You’ll need the Customize Application and Manage Public List Views permissions. Then, in Setup:
- Enter Queues in the Quick Find box and select Queues
- Click New
- Enter a Label and Queue Name; the label also names the list view your team works from, so make it obvious
- Add a short Queue Description so other admins know what it’s for
- Under supported objects, add each object the queue will hold, like Lead or Case
Next, look at Grant Access Using Hierarchies. When it’s on, users above the queue’s members in the role hierarchy can also access the queue’s records. Since Summer ’26, it’s off by default on new queues, while existing queues keep their current setting. So tick it if managers need that access.
3. Add Members and Choose Who Gets Notified
On the same page, add the people who can see the queue and take records from it. Members can be individual users, roles, roles and subordinates, or public groups. Depending on your org’s setup, you may also see options such as territories and partner users. Roles and public groups are easier to maintain because membership updates when you add users to the relevant role or group.
Then choose who hears about new records. If you enter a Queue Email, notifications go to that address. Tick Send Email to Members if members should get them too. If Queue Email is blank, members are notified regardless of the checkbox. On a busy queue, this can quickly create noise. To notify only a shared inbox, enter its address and leave Send Email to Members unticked.
Click Save, and Salesforce creates a list view with the queue’s name. Orders, service contracts, and knowledge article versions are exceptions, so you’ll need to build their list views separately.
4. Send Leads to the Queue With a Lead Assignment Rule
A new queue stays empty until something sends records to it. For leads, one option is a lead assignment rule. Salesforce evaluates rule entries in order, and the first match determines where the lead goes.
To configure a rule:
- In Setup, enter Assignment Rules in Quick Find and select Lead Assignment Rules
- Click New, name the rule, and activate it. Only one lead assignment rule can be active at a time
- Open the rule and click New to add an entry
- Set the Sort Order, define criteria (such as Country equals Germany), then choose Queue from the dropdown and select your queue
- Choose an email template if you want Salesforce to notify the new owner, then click Save
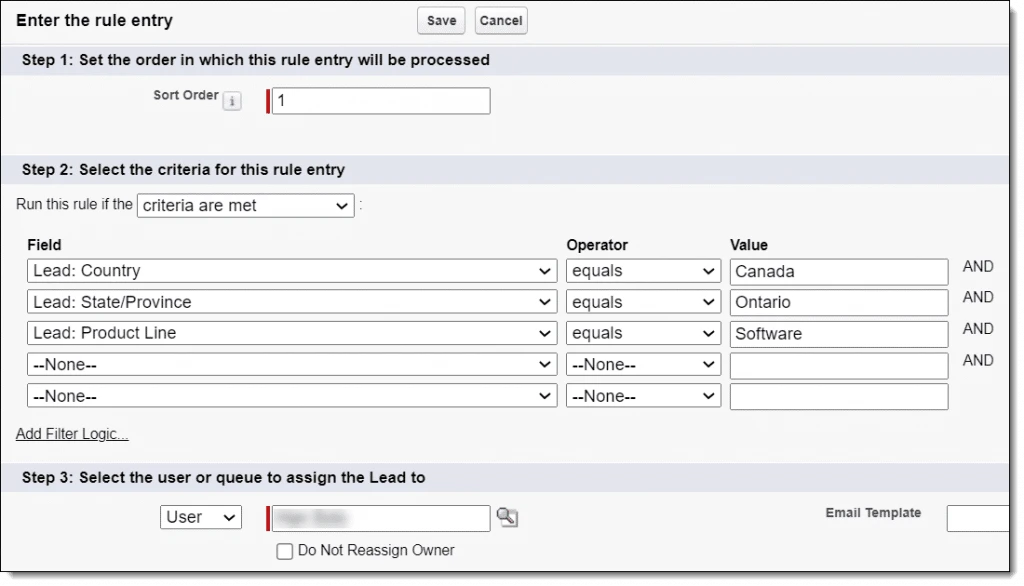
Put specific criteria first. It’s good practice to finish with an entry that has no criteria, which acts as a catch-all for leads that don’t match earlier entries. Salesforce’s rule-based assignment supports one active rule with up to 3,000 entries.
Web-to-Lead applies the active assignment rule automatically. When importing leads with the Data Import Wizard, select the option to apply an assignment rule if you want it to run. If a web lead matches no entry, Salesforce assigns it to the default lead owner in Lead Settings.
Leads created manually need the Assign using active assignment rule checkbox to apply the rule. You can show this checkbox, or select it by default, in the page layout’s Layout Properties.
5. Send Cases to the Queue With a Case Assignment Rule
Case assignment rules work similarly. Each entry checks a new case against criteria (such as Priority equals High) and assigns it to a user or queue. Cases that match no entry go to the Default Case Owner in Support Settings.
Cases created through Web-to-Case and Email-to-Case are automatically assigned using the active case assignment rule. When creating a case manually, select Assign using active assignment rules to apply the rule. You can also configure the page layout to select this checkbox by default.
6. Test the Queue and Show Reps How to Work It
Create a test lead or case that should match one of your rule entries, then check the queue’s list view. If the record goes to the default owner instead, review your criteria, entry order, and active rule.
Once routing works, show reps how to claim records. In the queue’s list view, select a record and click Accept to become its owner. Reps can also change the record owner directly. Users need Edit access to take ownership, subject to the org’s sharing settings.
For custom objects, the list-view Accept button is available only in Salesforce Classic. In Lightning Experience, users can change the record owner instead.
Queues vs. Direct Assignment
Each assignment rule entry can send a record to a queue or directly to one named user, known as direct assignment.
Direct assignment gives each record an owner straight away. But assignment rules can’t do round robin on their own, so spreading records evenly requires a workaround. And if that rep is on vacation or swamped, the record stays with them unless something reassigns it.
Queues let a team share the workload by taking records from a common pool. But they bring two problems.
| Direct assignment | Queue | Queue + automatic distribution | |
|---|---|---|---|
| Who owns a new record | One named rep | The queue until a rep takes ownership | A rep selected automatically |
| How work is shared | Separate rule entries assign records to reps | Reps choose which records to claim | Round robin, workload, or availability-based routing |
| When a rep is unavailable | Records stay assigned unless another process reassigns them | Other eligible members can claim records | Unavailable reps are skipped |
| Main risk | Uneven workloads | Cherry-picking and slow pickup | Time needed to configure and maintain routing rules |
1. Cherry-Picking
When reps choose their own records from a shared queue, many go for the easy ones. Salesforce’s own blog described agents “assigning to themselves only the easiest cases or the most promising leads.”
That leaves harder cases waiting longer, while the best leads go to whoever claims them first. It also makes performance harder to compare because each rep ends up working a different mix of records.
2. Slow Pickup
A record in a Salesforce queue is owned by the queue, not an individual rep. Until someone takes ownership, nobody is personally accountable for acting on it. If everyone is busy, a new lead can sit untouched for hours.
Slow responses are already common. In a 2011 audit of 2,241 US companies, Harvard Business Review found an average response time of 42 hours among companies that replied within 30 days.
Support cases face the same problem. An urgent case can sit in a queue while every agent assumes someone else will pick it up.
How to Distribute Records Out of a Queue Automatically
You don’t have to choose between a shared queue and an individual owner. Keep your queues and assignment rules, then add a step that assigns each record in the queue to a rep.
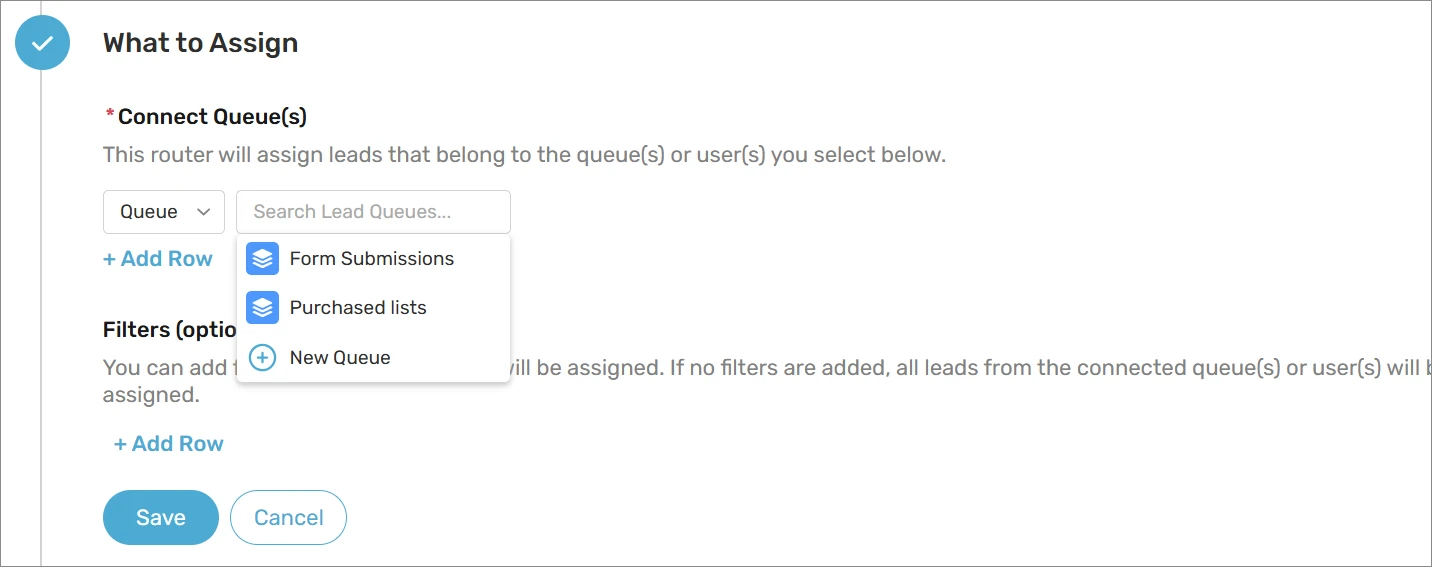
Kubaru is a native Salesforce app that assigns leads, cases, and other records automatically. Connect a queue to a Kubaru router, and it gives each record an owner using:
- Round robin: Records go to each rep in turn. With weights and limits, you can adjust each rep’s share and cap how much they receive
- Load balancing: Records go to the rep with the lowest active workload, so work doesn’t pile up on one person
- Availability: You can configure routing around reps’ scheduled working hours, skipping anyone who’s out of office or inactive in Salesforce
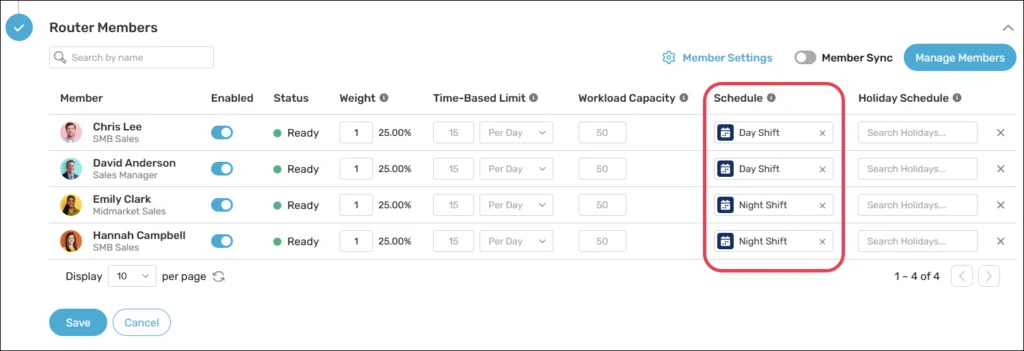
If no rep is available, you choose what happens: the record waits in the queue, moves on to another router, or goes to a backup user or queue. Kubaru uses response-time tracking to automatically reassign records that sit unworked too long. Ooma used Kubaru to bring its speed-to-lead under five minutes.
With Kubaru, you choose what counts as a response, how long to wait, and whether the clock only runs during working hours. Prefer letting reps claim records themselves? Shark Tank assignment has a blind mode that hides record details until someone claims them, so there’s no cherry-picking.
Support teams can use the same workload and availability criteria approach for case assignment. Your ops team can also manage routing themselves, without full Salesforce admin access.
FAQs
What’s the difference between a queue and a public group in Salesforce?
A queue can own records, but a public group can’t. Records stay in a queue until they’re assigned to someone. A public group is a set of users you can use to share access to records, such as through a sharing rule.
How many queues should you create in Salesforce?
Salesforce doesn’t limit the number of queues you can create. Start with one for each team and type of work, so everyone in a queue can take any record that lands in it. Review your queues when your teams change, and retire any that nobody works anymore.
What’s the difference between a queue and Omni-Channel?
A queue holds records until someone picks them up. Omni-Channel routes work from queues to available reps automatically, based on routing rules and each rep’s capacity. It requires an Agentforce Service license or an eligible add-on, so teams with only Sales Cloud licenses may need additional licensing.
Can you put opportunities in a Salesforce queue?
No. Opportunities aren’t on Salesforce’s list of objects that support queues, and neither are accounts or contacts. To share opportunities across a team, assign them directly or with a Flow. Kubaru also supports automated opportunity routing based on criteria, workload, and rep availability.
Decide How Records Get Out of Your Queues
Queues are one of Salesforce’s simplest tools. With the right members, good rule entries, and a tested list view, they’ll catch every record you send them. Just decide how records get back out, because a queue on its own leaves response times up to chance.
If you’d like every record in your queues assigned automatically, book a demo. We’ll show you how Kubaru works with the queues you already have. Every customer gets free onboarding and lifetime support.