What is Omni-Channel
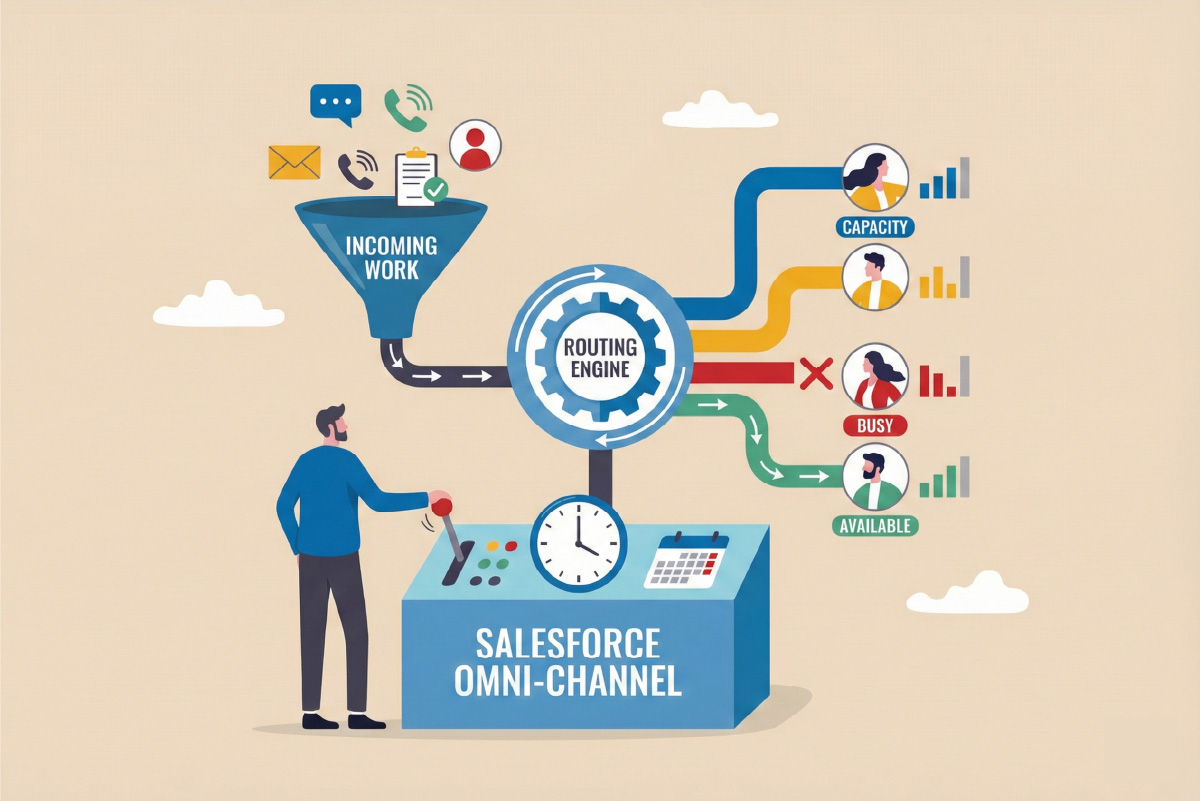
Omni-Channel is a native Salesforce feature that routes work items to users in real time based on availability, priority, and capacity. It is most commonly used in Service Cloud to distribute customer support cases across agents.
Instead of requiring agents to monitor queues and manually claim work, Omni-Channel automatically delivers the next available item to them inside the Service Console.
Omni-Channel can route work from multiple channels, including:
- Live Chat
- Messaging
- Email-to-Case
- Phone calls (with Service Cloud Voice)
- Cases and other supported objects
At a high level, Omni-Channel is designed for service-focused work routing, helping teams manage agent availability and balance workloads in real time. Whether it is the right solution depends on your routing complexity, supported objects, and overall Salesforce use case—topics covered later in this guide.
Benefits of Omni-Channel
Omni-Channel helps teams manage customer interactions more efficiently by automatically routing work to agents based on availability, capacity, and skills. This eliminates the need for agents to monitor queues or manually claim tasks, ensuring that cases and requests are handled promptly.
It supports multiple channels—such as live chat, messaging, email, phone calls, and cases—allowing agents to manage everything from a single console. By balancing workloads and prioritizing urgent items, Omni-Channel helps agents be more productive while providing faster, more consistent service to customers.
As a native Salesforce feature, it integrates seamlessly with Service Console and leverages existing dashboards and reports, simplifying setup and ongoing management for admins.
Limitations of Omni-Channel
While Omni-Channel is a robust native solution, it has structural boundaries that can create challenges as your routing needs grow. Below are some of the primary limitations to consider when determining if it meets all of your team’s requirements:
- Workload-Only Distribution: Assignment is designed strictly around user workload. It does not support Round Robin, Territory-based assignment, or Pull-based (Shark Tank) distribution.
- Incompatible with Some Objects: Does not function with Accounts, Contacts, Opportunities, Tasks, and most custom objects.
- No Schedule Awareness: Records cannot be assigned based on user schedules or shifts.
- No Duplicate Matching: Does not support checking for or merging duplicate records during the assignment process.
- No Time-Based Limits: Lacks native functionality to limit the number of records assigned per hour, day, etc.
- High Customization Overhead: Often requires Salesforce Flows or custom code to achieve desired functionality beyond basic routing.
- Administrative Dependency: Must be maintained and administered by Salesforce Admins.
- Licensing Prerequisite: Requires a Service Cloud User license.
Setting Up Omni-Channel
Now that you understand what Omni-Channel is, its advantages, and its limitations, it’s time to see how it can be implemented in Salesforce. Setting up Omni-Channel involves several key steps, from enabling the feature and assigning permissions to configuring routing rules, presence statuses, and service channels. Following a structured setup ensures that work is distributed efficiently, agents are not overloaded, and your team can take full advantage of real-time routing. In the sections below, we’ll walk through each step so you can get Omni-Channel up and running in your org.
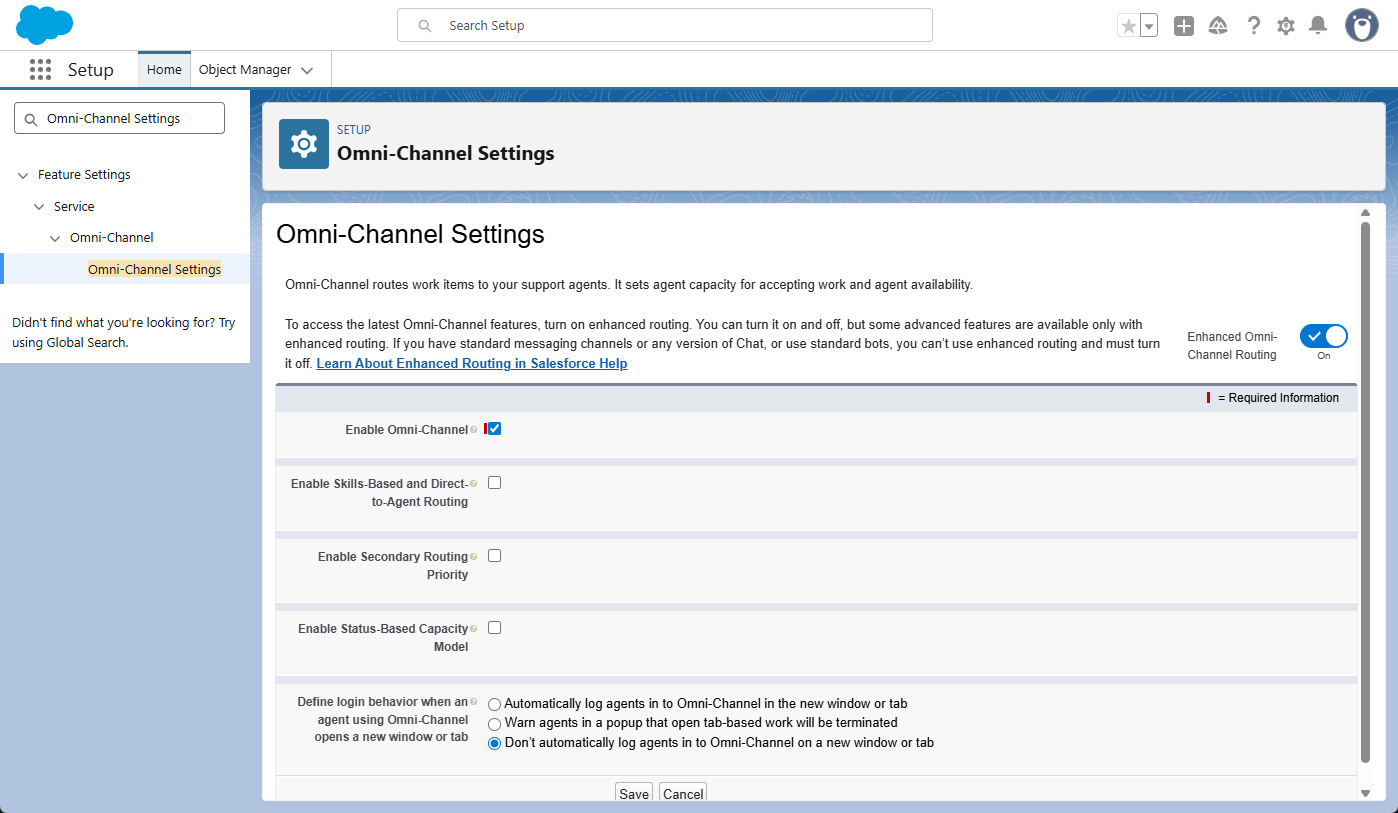
Step 1: Enable Omni-Channel
The first step to using Omni-Channel is ensuring you have the correct license and enabling the feature in Salesforce. By default, Omni-Channel is not active, so it must be turned on in Setup before any routing configurations can be created.
To begin, go to Setup, search for Users, and select your user record. Ensure that the Service Cloud User checkbox is checked, and be sure to enable this for every user who will need to access Omni-Channel features. Once that is confirmed, follow these steps to enable the service:
- In the Setup Quick Find box, enter Omni-Channel Settings and select it.
- Check the box for Enable Omni-Channel.
- Optional: If you plan to use Skills-Based routing, check Enable Skills-Based and Direct-to-Agent Routing now to save time later.
- Click Save.
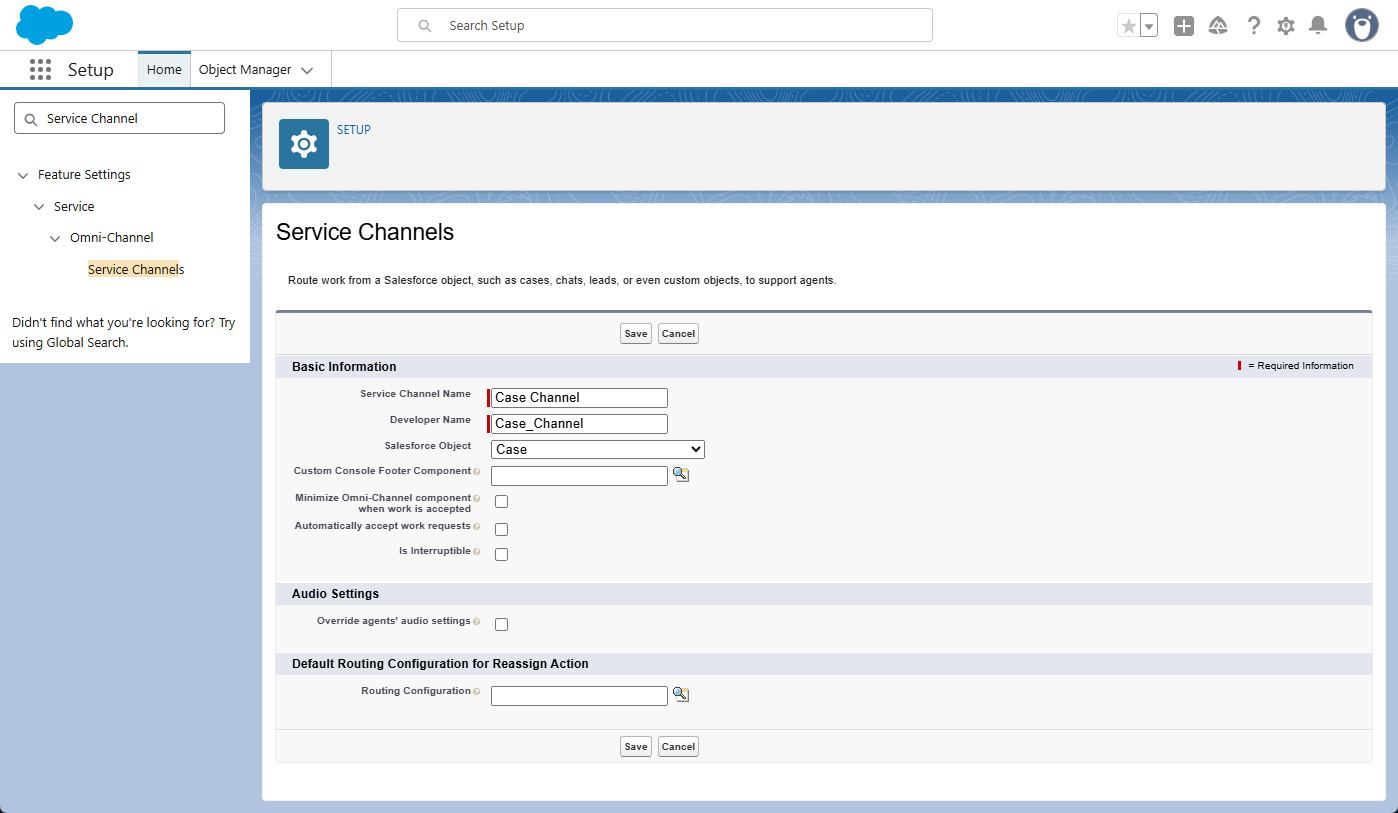
Step 2: Create Service Channels
Service Channels turn Salesforce objects (like Cases or Leads) into “work items.” This tells Omni-Channel which records are eligible to be routed to your agents. Setting this up now allows you to link these channels to your agent’s “Available” status in the next step.
How to set it up:
- Go to Setup and search for Service Channels.
- Click New.
- Service Channel Name: Enter a name (e.g.,
Case Channel). - Salesforce Object: Select the object you want to route (e.g.,
Case). - Click Save.
Step 3: Create Presence Statuses
Presence Statuses are the options agents select within the Omni-Channel widget to indicate their availability. These statuses determine whether an agent is “Online” and ready to receive work or “Busy” and unavailable for assignments.
How to set it up:
- In Setup, search for Presence Statuses and click New.
- Status Name: Enter a name for the status (e.g.,
AvailableorOn Break). - Status Options:
- Select Online if you want agents to be eligible for work assignments while using this status.
- Select Busy for statuses where the agent is logged in but should not receive new work (such as “Lunch” or “In Meeting”).
- Service Channels: If you selected the “Online” option, find the Service Channels you created in the previous step and move them to the Selected Channels column.
- Click Save.

Note: Repeat these steps to create at least one “Online” status and one “Busy” status to give your agents the necessary options. Simply creating these statuses is not enough to make them appear for your agents. You must also grant access to these specific statuses via Permission Sets or Profiles in the next step.
Step 4: Assign Omni-Channel Permissions
Once your statuses are created, you must grant agents the authority to use them. This is managed through Permission Sets or Profiles, where you define which specific Presence Statuses an agent is allowed to select.
How to set it up:
- Go to Setup and search for Permission Sets (or Profiles).
- Select the Name of the Permission Set or Profile assigned to your agents.
- Note: If you are using Profiles, click the name itself. Do not click the “Edit” link next to the name, or the status access section will be hidden.
- Find and click the link for Service Presence Statuses Access.
- Click Edit.
- Select the statuses you created in the previous step (e.g.,
AvailableandIn Meeting) and move them to the Enabled Service Presence Statuses column. - Click Save.
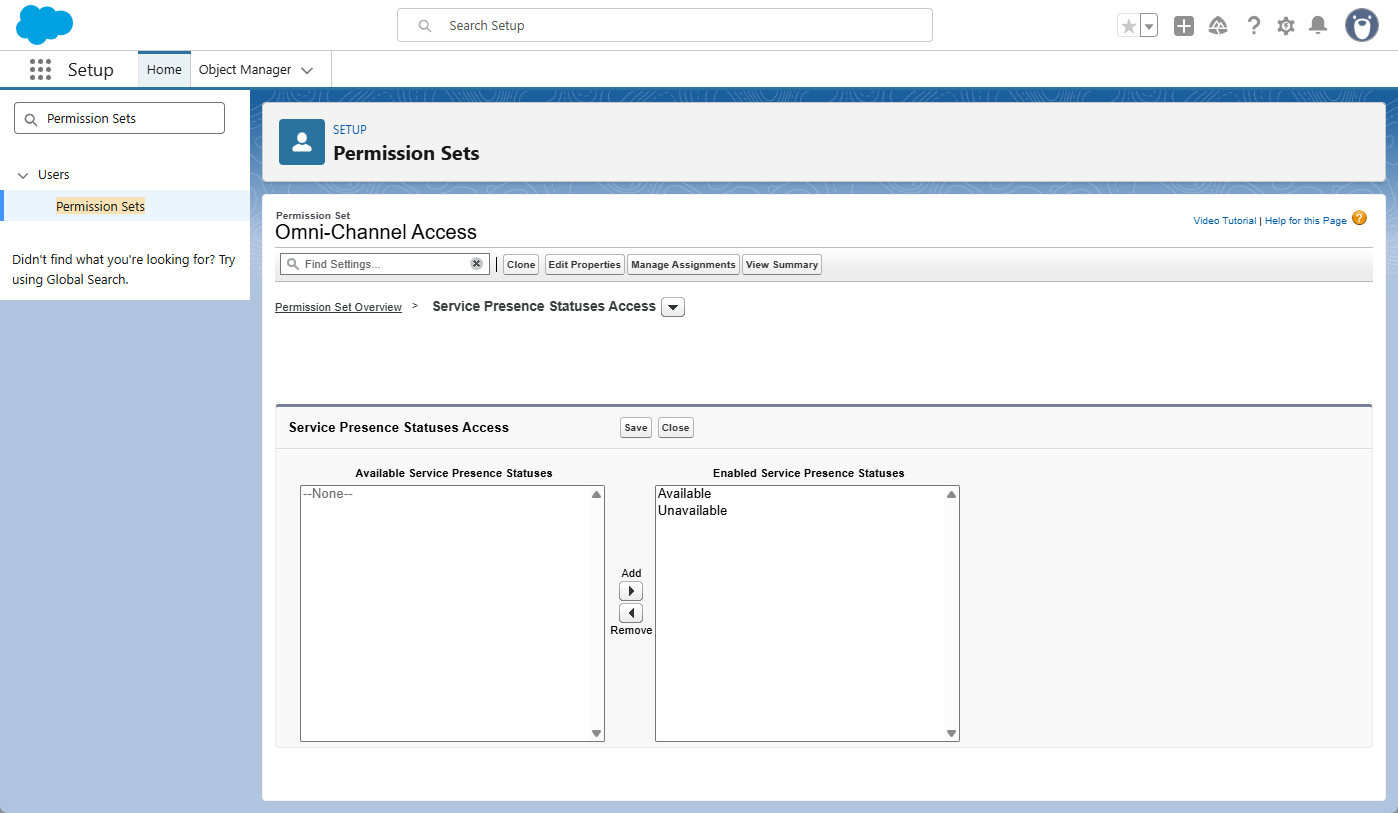
By completing this step, you ensure that the Omni-Channel widget will be visible to your agents and that they have the specific availability options needed to start receiving work.
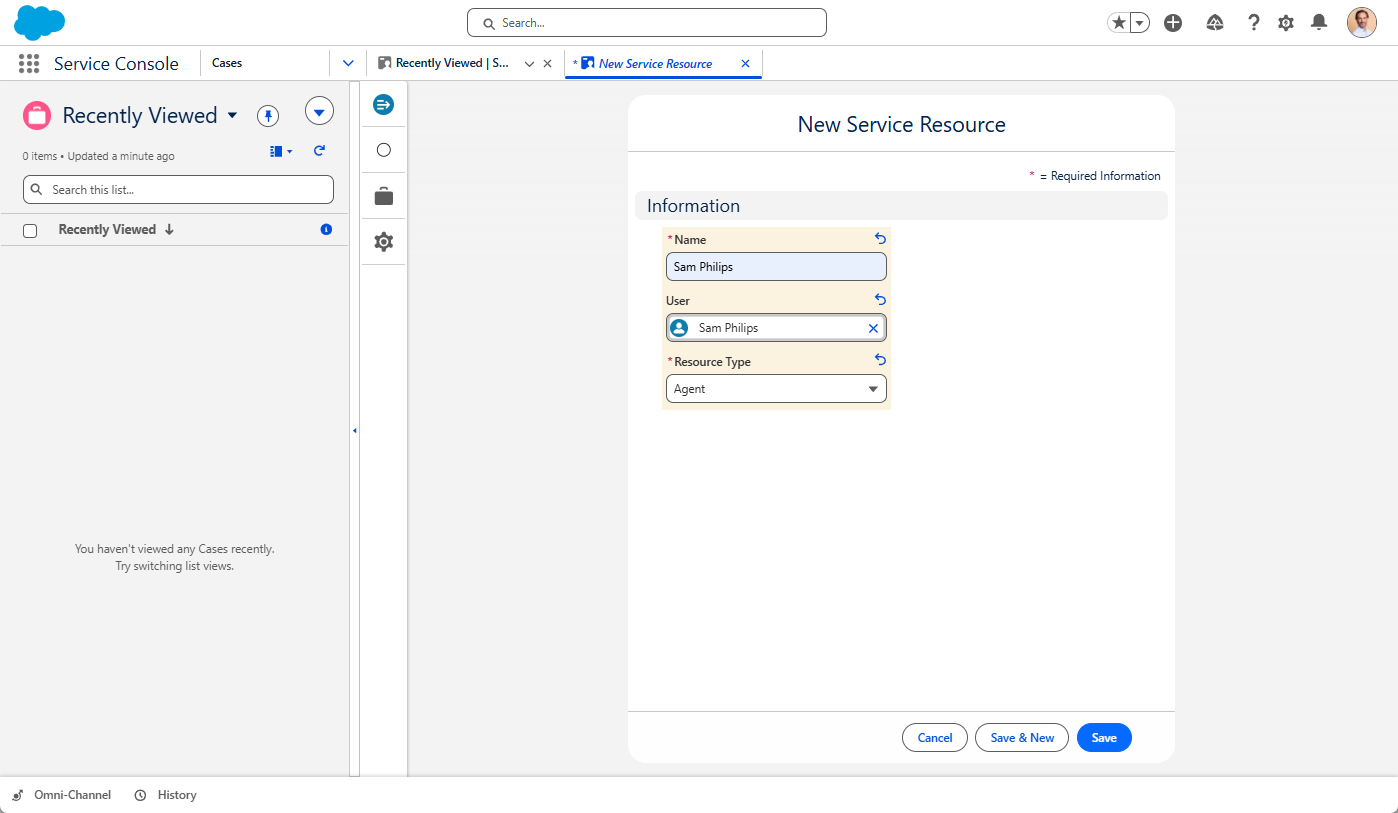
Step 5: Create Service Resources
A Service Resource record officially designates a user as an agent who is eligible to receive work. Without this record, agents will not appear in the Omni Supervisor dashboard, and work cannot be routed to them.
How to set it up:
- Click the App Launcher (9-dot icon) and search for Service Resources.
- Click New.
- Note: If the “New” button is missing, you may need to ensure the “Agent” Record Type is assigned to your Profile within Object Settings.
- Name: Enter the agent’s name.
- User: Search for and select the corresponding Salesforce User.
- Resource Type: Select Agent.
- Active: Ensure this checkbox is checked.
- Click Save or Save & New if you have more users to add.
- Create a unique Service Resource record for every user who will be using Omni-Channel.
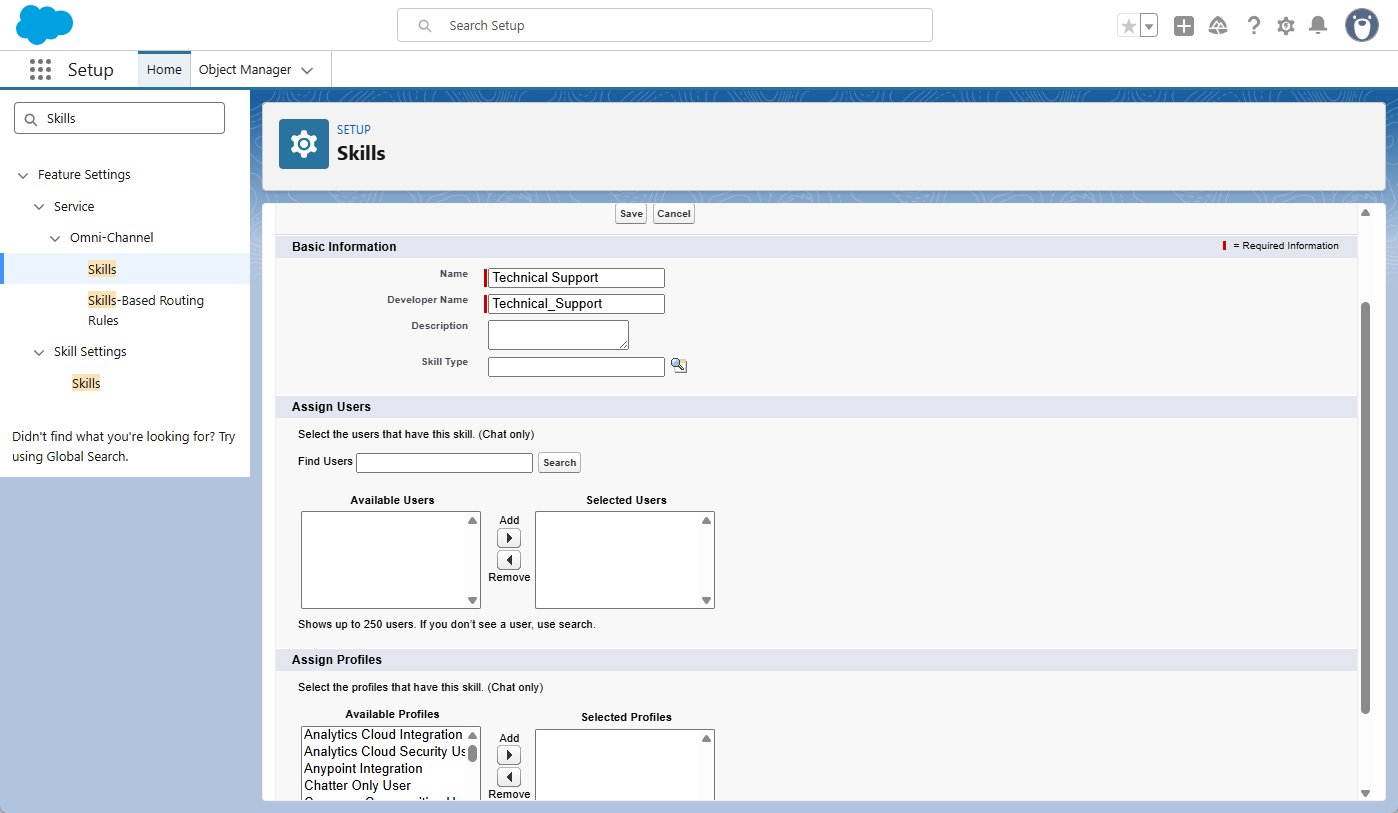
Step 6: Create Skills (Optional)
Note: If you are not using skills-based routing and prefer to route work purely through Queues, you can skip this step and proceed to the next section.
Skills are used to categorize the expertise or certifications of your agents. When using skills-based routing, Omni-Channel matches the requirements of an incoming work item (like a “French” or “Technical” tag) with the skills assigned to your available agents.
How to set it up:
- In Setup, search for Skills and select it under the Omni-Channel menu.
- Note: If “Skills” does not appear, go back to Step 1 and ensure you checked the “Enable Skills-Based and Direct-to-Agent Routing” box.
- Click New.
- Name: Enter a descriptive name for the skill (e.g., Technical Support or Spanish).
- Assign Users/Profiles: Skip this section.
- Click Save.
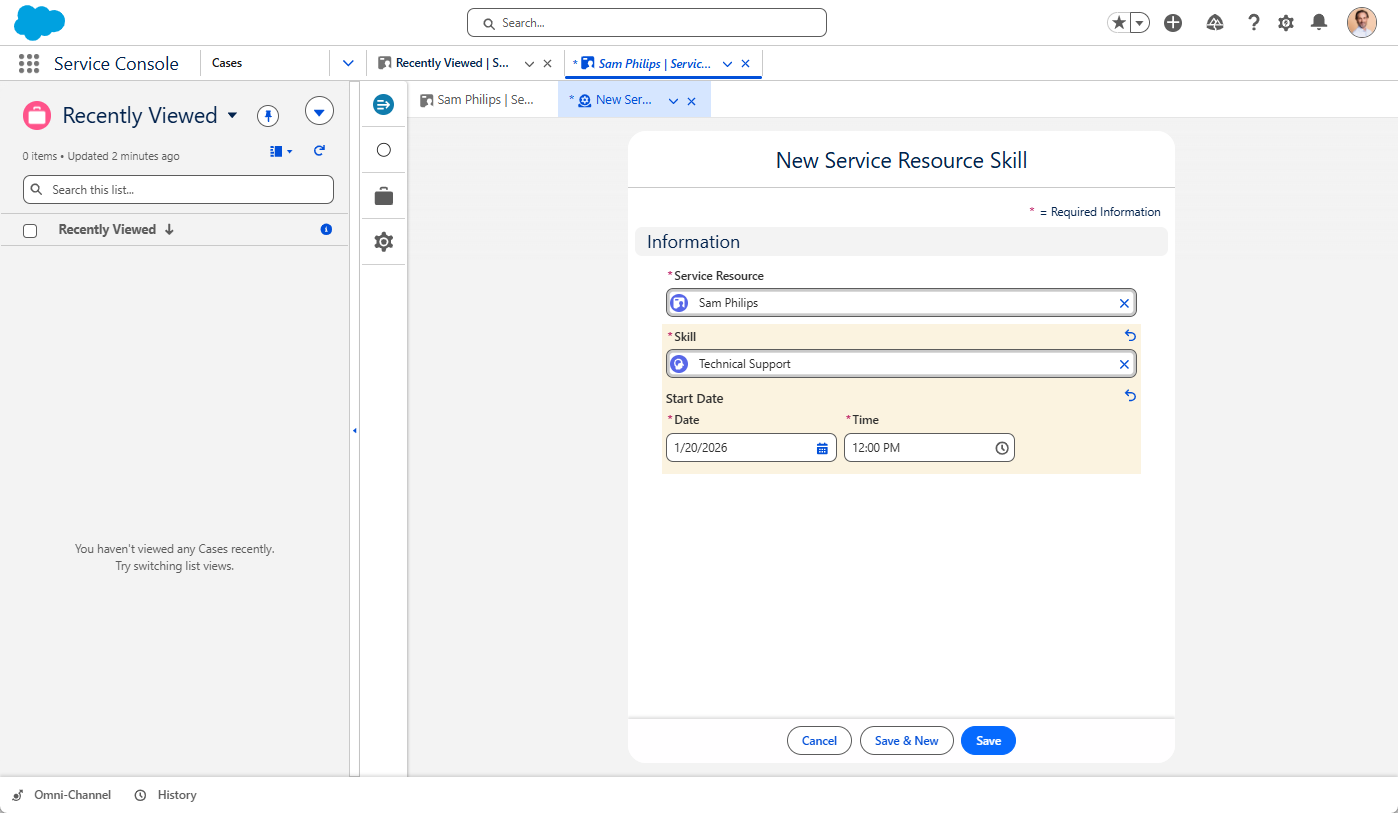
Linking Skills to the Resource: Once your skills are created, you must link them to the Service Resource records you created in Step 5:
- Go back to the Service Resource record for your agent.
- Click the Related tab.
- In the Service Resource Skills list, click New.
- Note: If you don’t see this list, go to Object Manager > Service Resource > Page Layouts. Select Service Resource Layout, click Related Lists in the top palette, and drag the Service Resource Skills list onto the page.
- Select the Skill and set a Start Date.
- Click Save.
- Assign Skill Level: Once saved, you can assign a Skill Level (1–10) to the record. If the field did not appear in the previous step, click Edit on the new skill record to add the level now.
Step 7: Create Routing Configurations
Routing Configurations act as the “brain” of Omni-Channel. They determine how Salesforce prioritizes incoming work items and how much of an agent’s total capacity each individual record consumes.
How to set it up:
- In Setup, search for Routing Configurations and click New.
- Routing Config Name: Enter a name for these rules (e.g.,
Standard Case Routing). - Routing Priority: Enter a number to set the order of importance, with 1 being the highest priority.
- Routing Model: Choose the logic Salesforce uses to find an agent:
- Least Active: Assigns work to the agent with the fewest total number of open items.
- Most Available: Assigns work to the agent with the most remaining “empty” capacity.
- Units of Capacity: Enter the amount of capacity each record requires (e.g., if you set this to 2 and an agent has a total capacity of 10, they can handle exactly 5 of these cases at once).
- Use with Skills-Based Routing Rules:
- Check this box if you intend to route work based on the skills we created in Step 6.
- Leave this unchecked if you want to route work based purely on who is a member of a Queue.
- Click Save.
Note: If your agents manually reassign records, go back to your Service Channel (Step 2) and select this Routing Configuration in the “Default Routing Configuration for Reassign Action” field. This ensures that moved records still follow your defined capacity and priority rules.
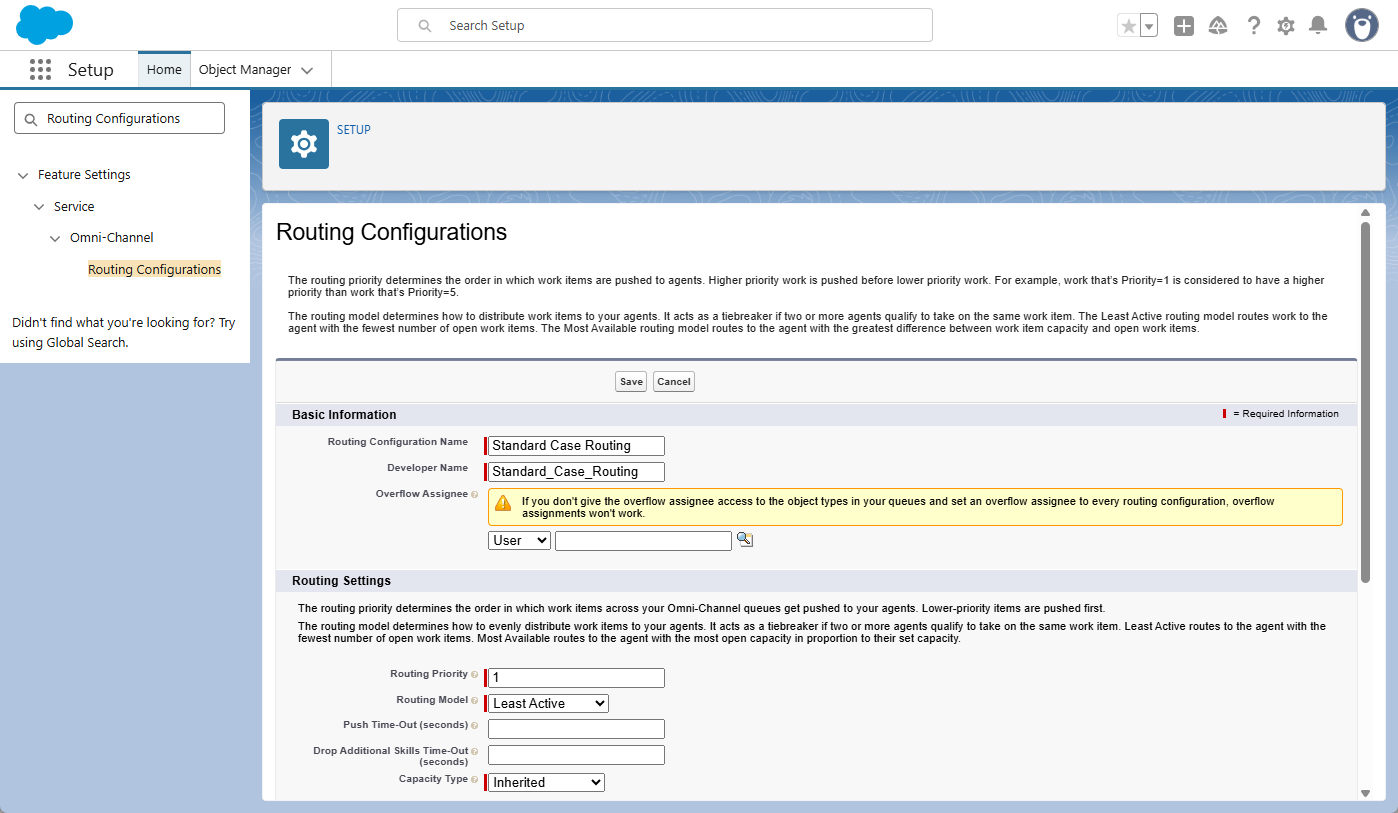
Important: These rules only become active once they are linked to a Queue. You will perform this connection in the next step.
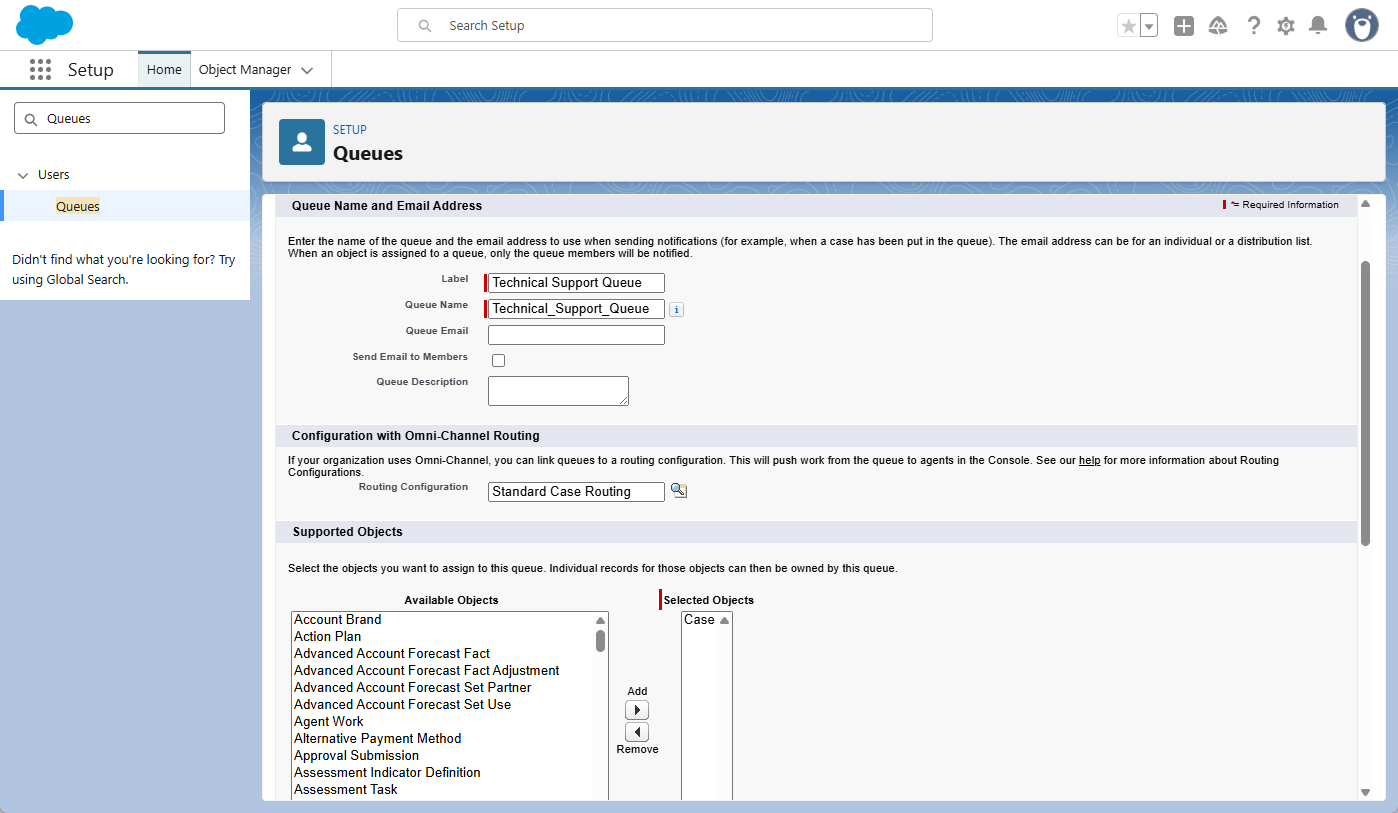
Step 8: Create Queues
Queues act as the “holding area” for work items before they are assigned to an agent. In an Omni-Channel setup, the Queue is the bridge that connects your work (the Salesforce Object) to your distribution rules (the Routing Configuration).
Note: If you are using Skills-Based Routing, you still need to create a queue. It serves as the entry point for the work before Omni-Channel evaluates an agent’s specific skills to make the final match.
How to set it up:
- In Setup, search for Queues and click New.
- Label: Enter a name for the queue (e.g.,
Technical Support Queue). - Routing Configuration: This is the most important step. Search for and select the Routing Configuration you created in the previous step.
- Supported Objects: Under the Available Objects list, select the object you are routing (e.g.,
Case) and move it to the Selected Objects list. - Queue Members:
- Queue-Based Routing: Add the specific Users or Public Groups who should receive work from this queue.
- Skills-Based Routing: You can leave this section empty. Salesforce will find agents based on their skills instead of their membership here.
- Click Save.
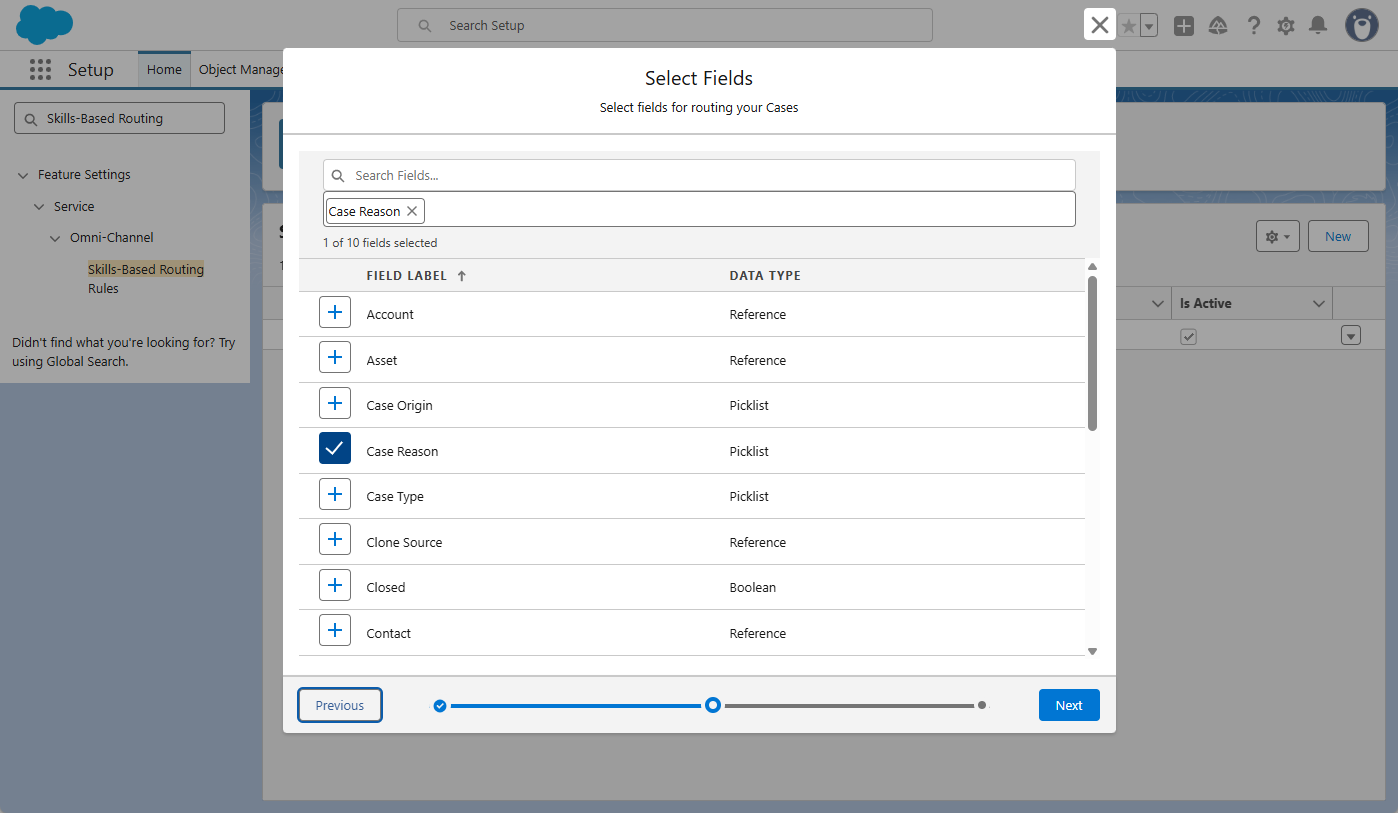
Important Note for Skills-Based Routing: If you are using skills, you must complete one final task to tell Salesforce how to match a record to a skill. Follow these steps to map your fields:
- In Setup, search for Skills-Based Routing Rules and click New Skill Mapping Set.
- New Skill Mapping Set
- Skill Mapping Set Label: Enter a descriptive name (e.g., Case Skill Mapping).
- Object: Select the object you are routing (e.g., Case).
- Click Next.
- Select Fields
- Choose the field(s) that contain the criteria needed to determine a skill (e.g., Language or Case Reason).
- Click Next.
- Map Field Values to Skills
- Field Value: Select the specific value that triggers the requirement (e.g., Complex Functionality or Spanish).
- Skill: Select the matching Skill you created in Step 6.
- Skill Level (Optional): Enter a minimum proficiency level if required, otherwise leave it at the default (0).
- Click Done and then Save.
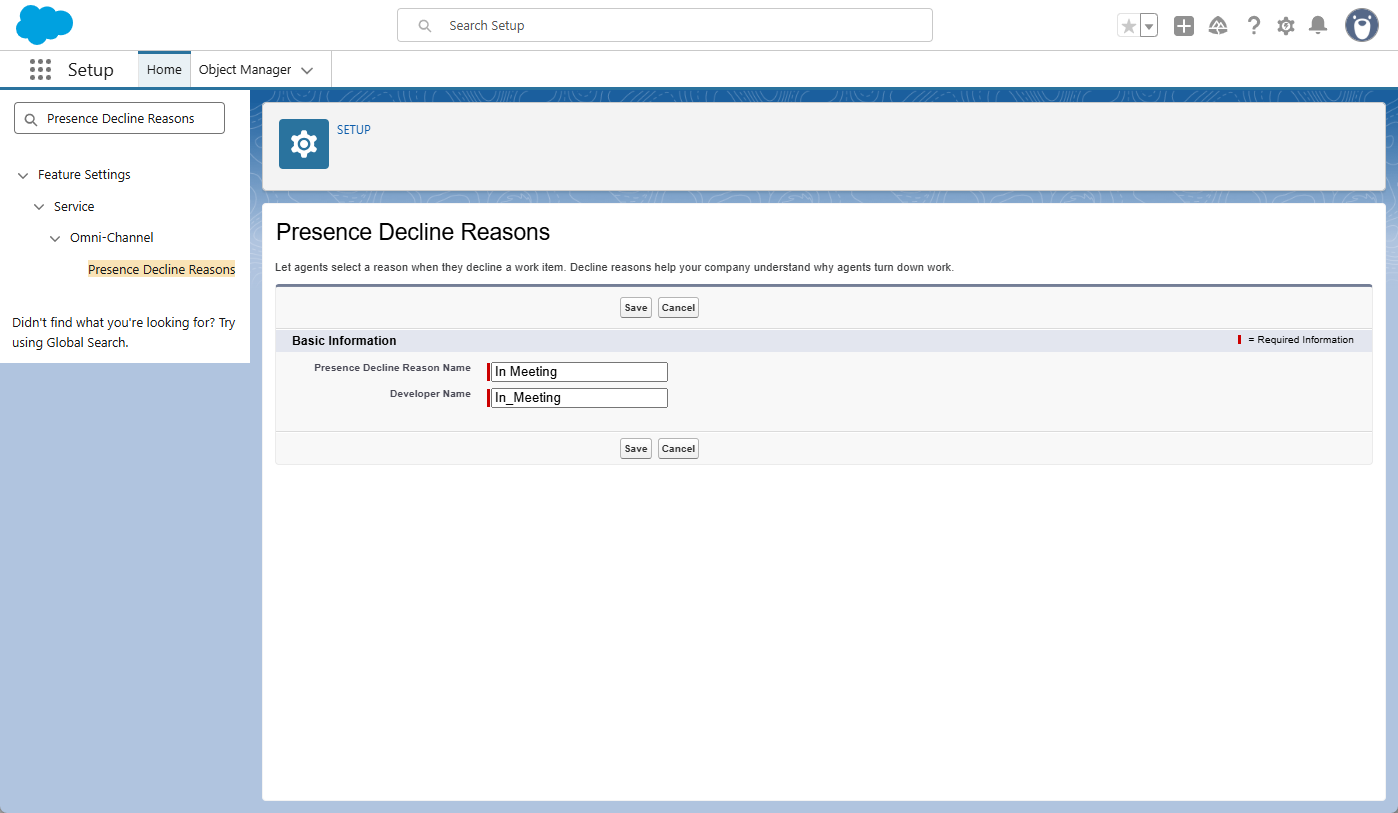
Step 9: Create Presence Decline Reasons
Presence Decline Reasons provide insight into why agents are unable to accept specific work assignments. When an agent clicks “Decline” on a new work request, they will be prompted to select a reason (e.g., Currently on a Call or Researching Case), which then appears in supervisor reports.
How to set it up:
- In Setup, search for Presence Decline Reasons and click New.
- Decline Reason Name: Enter a descriptive name (e.g.,
In Meeting). - Click Save.
- Repeat these steps for any other common reasons you want to track.
How to enable the “Decline” feature: Simply creating the reasons is not enough; you must enable the decline functionality within your agent settings. You can do this by editing the Default Presence Configuration (which we will cover in detail in the next step).
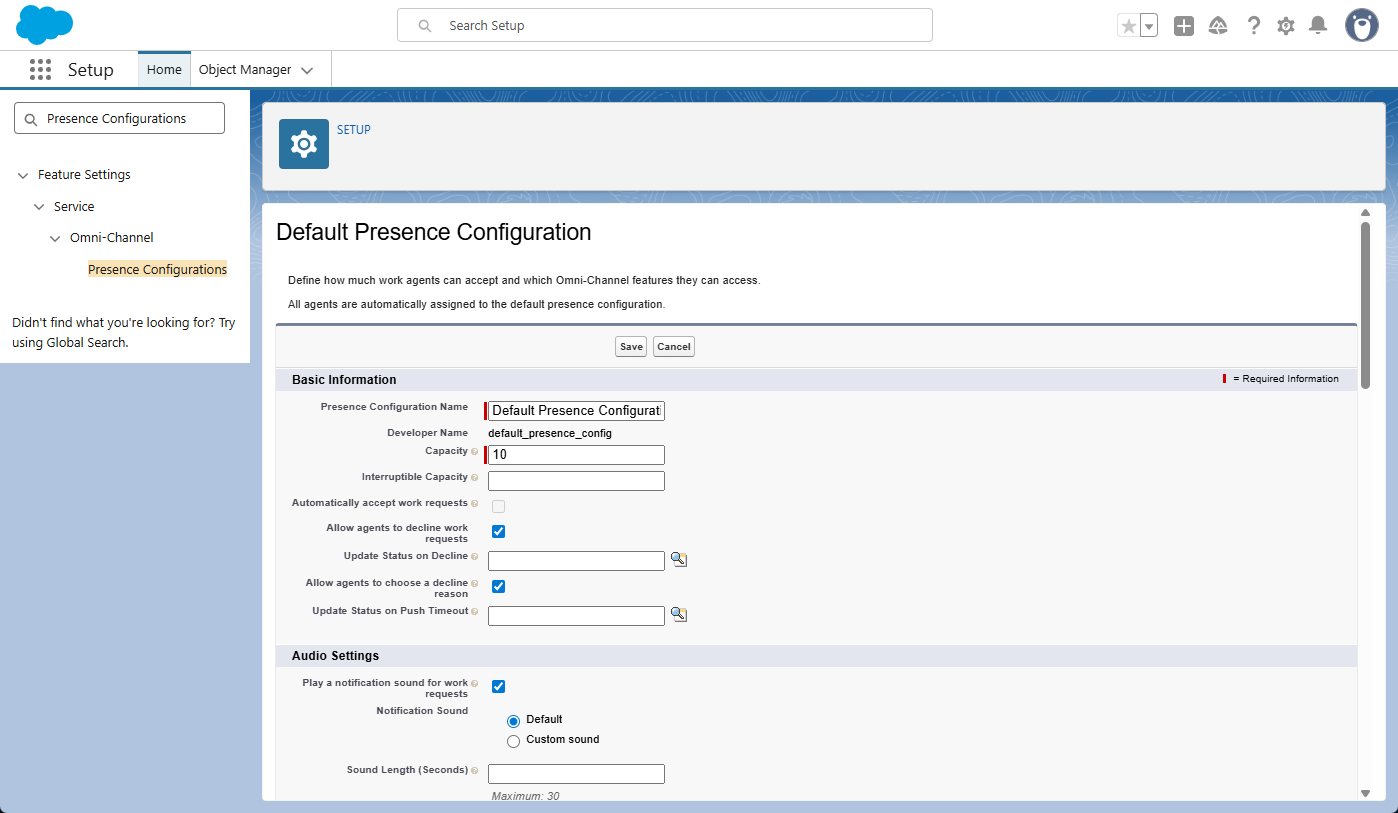
Step 10: Create Presence Configurations
Presence Configurations act as the master settings for your agents. This is where you define an agent’s total workload capacity and determine which specific features they can access, such as the ability to decline work or see notifications.
How to set it up:
- In Setup, search for Presence Configurations.
- Click New (or edit the Default Presence Configuration).
- Capacity: Enter the maximum number of “Units of Capacity” an agent can handle at once.
- Example: If you set this to 10 and your cases are weighted at 2 (from Step 7), the agent can handle 5 cases simultaneously.
- Agent Settings: Check the boxes for the features you want to enable, such as Allow Agents to Decline Requests or Display Dashboard on Login.
- Assign Decline Reasons: In the Decline Reasons section, select the reasons you created in Step 9 and move them to the Selected Decline Reasons list.
- Assign Users/Profiles: Select the specific users or entire profiles that this configuration should apply to and move them to the selected list.
- Note: If you are editing the Default Presence Configuration, the “Assign Users/Profiles” section will not be available. This is because the Default config automatically applies to anyone who isn’t assigned to a custom one.
- Click Save.
Step 11: Create Supervisor Configurations
Supervisor Configurations define what your managers can see and do within the Omni-Channel Supervisor dashboard. This ensures that supervisors have the correct visibility into agent activity and the ability to intervene when a queue needs attention.
How to set it up:
- Navigate to Setup: Search for Supervisor Configurations in the Quick Find box and click New.
- Omni Supervisor Configuration Name: Enter a descriptive name (e.g., Support Manager Configuration).
- Which Supervisors Are Impacted? Select the specific Users or Profiles who should have this configuration and move them to the Selected list.
- Note: If a manager does not appear in the search list, verify that they have been assigned a Service Presence Status via a Permission Set or Profile.
- What Appears in Omni Supervisor for These Supervisors?
- Select Visible Agents: (Optional) Select specific Public Groups or Profiles if you want to restrict this supervisor’s view. If you leave this blank, they will be able to see all agents.
- Select Visible Agentforce Agents: (Optional) Select any AI agents if your team is utilizing Agentforce.
- Select Visible Queues: (Optional) Select specific Queues to restrict this supervisor’s view. If you leave this blank, they will be able to see all queues.
- Define Visible Skills: (Optional) Select specific skills if your organization uses Skill-Based Routing.
- Define Actions: Check the boxes for the administrative powers you want to grant.
- Define Visible Tabs: These may be pre-selected by default. Verify that the tabs you want (e.g., Service Reps and Queues Backlog) are in the Selected Tabs list. If not, move them over manually.
- Click Save.
Step 12: Add Omni-Channel to the Utility Bar
The final step is making the Omni-Channel widget visible to your agents. You do this by adding it to the Utility Bar of your Lightning Console App, which places the widget at the bottom of the agent’s screen for easy access.
How to set it up:
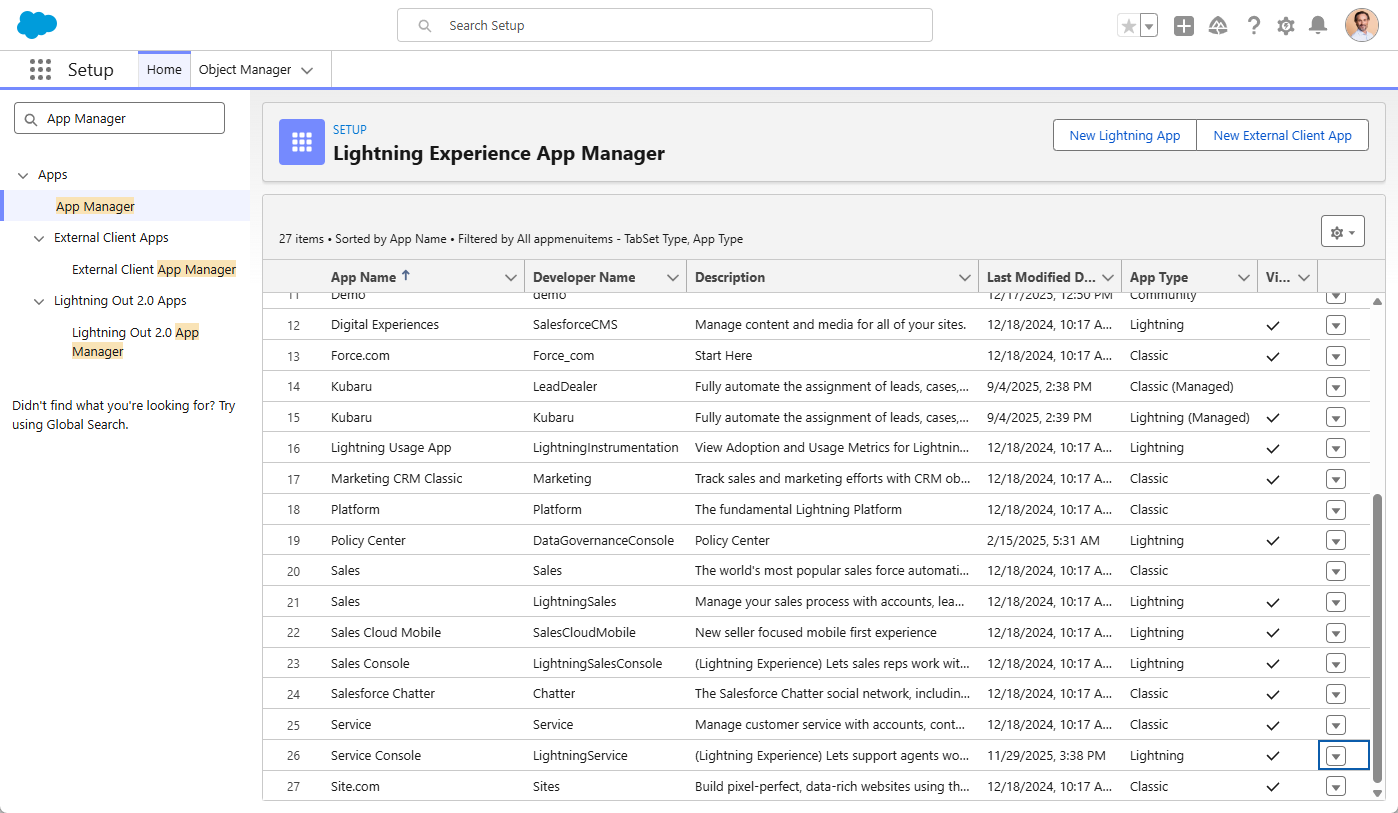
- In Setup, search for App Manager.
- Find the Service Console app (ensure it is the Lightning version), click the dropdown arrow on the far right, and select Edit.
- In the App Settings menu, select Utility Items (Desktop Only).
- Click Add Utility Item.
- Search for and select Omni-Channel.
- Panel Settings: You can keep the default width (340) and height (480) or adjust them to fit your team’s preferences.
- Click Save.
Congratulations! Your agents can now open the Service Console and use the Omni-Channel widget to set their status to “Available.” Once active, they will begin receiving work items automatically based on the routing rules you configured.
Omni-Channel vs Kubaru
Omni-Channel’s rigid configuration often forces teams into complex workarounds for basic routing needs. Kubaru overcomes these limitations with a flexible, user-friendly engine that intelligently assigns work based on capacity, schedules, and existing relationships—ensuring nothing gets stuck in the queue.
| Feature | Kubaru | Enhanced Omni-Channel |
| Assign Any Object | Supported | Not Supported. Only supports specific objects (e.g., Cases, Leads). Does not support Accounts, Contacts, Opportunities, Tasks, or most Custom Objects. |
| Criteria-Based Assignment | Supported | Not Supported. Routing is limited to the queue level. |
| Round Robin Assignment | Supported | Not Supported (only supports routing based on user capacity) |
| Load Balanced Assignment | Supported | Supported |
| Skill-Based Assignment | Supported | Limited. Requires Flows or custom code for logic beyond basic skill matching, such as defining AND/OR filter criteria. |
| Territory-Based Assignment | Supported | Not Supported |
| Shark Tanks (i.e., pull-based distribution) | Supported | Not Supported |
| Workload Capacity Limits | Supported | Limited. Supports only a single total capacity limit per user. Does not allow for different limits based on the specific type of record being assigned. |
| Workload Scoring | Supported | Limited. Capacity consumption is static per configuration. It lacks the ability to dynamically calculate weight based on individual record attributes. |
| Time-Based Limits | Supported | Not Supported |
| User Schedules | Supported | Not Supported (user status must be selected manually) |
| Out Of Office Schedules | Supported | Not Supported |
| Reassignment | Supported | Not Supported |
| Duplicate Matching | Supported | Not Supported (this would need to be done before records enter the queue) |
| Assignment Ordering | Supported | Supported |
| Member Sync | Supported | Not Supported |
| Field Updates | Supported | Not Supported |
| Assignment Logs | Supported (detailed assignment logs indicate which skills factored into each assignment) | Not Supported (field history tracking will record ownership changes—but additional details such as skills are not recorded) |
| Administered by Business Users | Supported (Kubaru can be fully administered by your business users and does not require Salesforce admin permissions) | Not Supported (must be administered by a Salesforce Admin) |
| Customer Support | Free Lifetime Support Included (includes full onboarding, training, technical support, etc.) | Limited (Salesforce support will provide assistance with technical issues—but will not provide hands-on configuration or guidance on best practices) |
Conclusion
Setting up Omni-Channel is a significant milestone in transforming your Salesforce instance into a real-time service engine. By following these 12 steps, you’ve moved beyond basic queues and into a world of automated, capacity-based routing that ensures your agents are never overwhelmed and your customers receive faster responses.
However, as your organization grows and your routing requirements become more nuanced, it’s important to remember that native tools are just the starting point. Whether you stick with a pure Omni-Channel setup for live support or choose to bridge the gap with a tool like Kubaru for more flexible distribution, the goal remains the same: getting the right work to the right person at the right time. With this foundation in place, you’re now ready to scale your operations and provide a more seamless experience for both your team and your customers.
FAQ
Which objects support Omni-Channel routing?
Omni-Channel is designed for a specific set of work items, primarily Cases, Leads, Social Posts, Messaging Sessions, and Voice Calls. It does not support many commonly used Salesforce objects—such as Accounts, Contacts, Opportunities, and Tasks—nor does it support Custom Objects that lack a primary object relationship.
Does Omni-Channel work with Sales Cloud?
While Omni-Channel is a Service Cloud feature, it can be used to route records like Leads for sales teams. However, it requires a Service Cloud User license for every agent using the tool, and it lacks some common sales-specific logic like round-robin assignment.
What happens to work items if no agents are online?
By default, if no agents are in an “Available” status, the work items will simply sit in the Queue. They will stay there until an agent logs in and changes their status to “Available,” at which point Omni-Channel will push the oldest or highest-priority items to them. Omni-Channel does not natively support “overflow” routing to a different team or automated 24/7 assignment for offline agents.
Does Omni-Channel automatically reassign a record if an agent stops working on it?
No. Once an agent “Accepts” a work item, it is officially assigned to them. If that agent goes to lunch, loses their internet connection, or simply forgets the record is open, Omni-Channel will not automatically pull it back or reassign it to someone else. This “automated retrieval” is a common reason teams look for third-party solutions that can track inactivity and reroute “stuck” records.
How does Salesforce determine an agent’s “Capacity”?
Capacity is calculated based on “units” defined in your Routing Configuration. For example, if an agent has a total capacity of 10 and each record is weighted at 2 units, the agent can handle up to 5 records at once. Once they reach their 10-unit limit, no new work is pushed to them until they close or reassign an existing item.
Can I set different capacity limits for different types of work?
In native Omni-Channel, an agent has a single “Total Capacity” (e.g., 10 units). While you can weight different records differently (e.g., a Case is 5 units and a Lead is 2), you cannot easily set a rule that says “Agent A can handle 3 Cases AND 2 Leads, but never more than 2 Leads.” Managing complex, multi-object workload balance often requires manual intervention or a more advanced distribution tool.