Quick Summary
Round robin assignment distributes records evenly so every rep gets a fair share and leads move fast. This guide walks through how to set up round robin in Salesforce using native tools, where those limits show up, and how Kubaru handles the same process in a cleaner, more flexible way across any Salesforce object.
Why Round Robin Salesforce Assignment Matters
Round-robin is important because it provides a simple way to move leads around without adding all of the manual work on the same few people. When assignments depend on either a manual step or timing, leads fall through and reports become unclear. A rotation keeps the process fair and predictable.
Salesforce can manage a basic loop but becomes very limited when you add schedules, weights, or objects outside of Leads. As your process evolves, you need something built to manage that complexity.
Why Listen to Us
We work with sales teams every day who rely on Salesforce for fast, accurate routing. Over 100 companies across SaaS, fintech, and healthcare use Kubaru to keep assignments moving and to give sales ops more control without looping in IT for every change. Being native to Salesforce means we see where standard rules, flows, and custom fixes start to break down.
The guidance here comes from real setups and real customer challenges. We’ve helped teams untangle routing issues of every size, and the solutions in this guide reflect what consistently works.
What Is Round Robin Salesforce Assignment?
Round robin assignment dispatches any new record to the next person in the queue so distribution over time stays even. In a round robin cycle of three representatives this is easy to understand: A, B, C, A. No one gets any more records than the others, and no one is overlooked.
For example, if you have three users:
- Lead 1 is assigned to user 1
- Lead 2 is assigned to user 2
- Lead 3 is assigned to user 3, then the cycle repeats
- Lead 4 is assigned to user 1
- Lead 5 is assigned to user 2
- Lead 6 is assigned to user 3, then the cycle repeats.
Setting Up Round Robin Salesforce Assignment (Native Method)
It’s common knowledge that Salesforce doesn’t provide a built-in round robin feature, but you can build one using custom fields and lead assignment rules. This approach works for small teams with simple needs, though it comes with a lot of limitations we’ll address after walking through the setup.
Step 1: Create a Lead Number Autonumber Field
- The foundation of native round robin is giving each lead a unique sequential number. This creates the rotation pattern.
- Open Setup and search for Object Manager.
- Click Lead, then Fields & Relationships, then New.
- Select Autonumber as the field type and click Next.
- Name your field “Lead Number”. In Display Format, enter {0}. In Starting Format, enter 1.
- Check the box for “Set this field as the unique record identifier from an external system” and click Next.
- Set field-level security to give the appropriate users read access, then click Next.
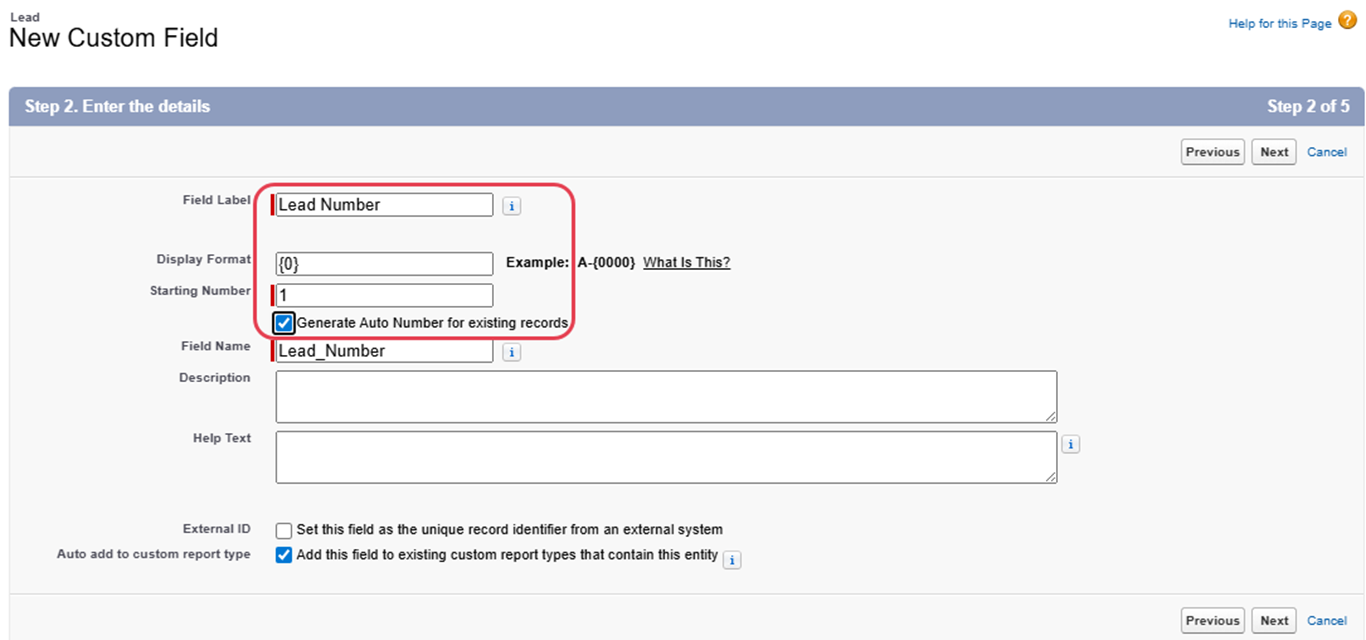
- Uncheck all page layout boxes since users don’t need to see this field, and click Save & New.
Step 2: Create a Round Robin Formula Field
The Round Robin formula field essentially converts that sequential lead number into a rotation position, which tells Salesforce which user should get each lead.
- First off, select Formula as the field type and then click on Next to move on. Call your field “Round Robin” and choose Number as the return type – remember to set the Decimal places to 0, then click on Next.
- Now select Advanced Formula and paste this formula: MOD(VALUE({!Lead_Number__c}),3)+1 into the box
- This formula has a couple of critical bits to it. First things first, you’ve got to ensure that the part of the formula that says Lead_Number__c actually does match the API name of that autonumber field you created back in Step 1. If you called it something else – no worries, just swap it out with the right name. Second, if you’ve got a rotation of 5 people for example, you’ll need to swap the 3 in that formula for a 5. If you only have 2 reps on your team then you’ll need to change the 3 to a 2.
- The MOD bit of this formula works by dividing the lead number by the number of people in your rotation and returns the remainder, then adds 1. What this does is create a rotation pattern where leads 1, 4, 7, 10 all get a value of 1, leads 2, 5, 8, 11 get a value of 2, leads 3, 6, 9, 12 get a value of 3 – and it just keeps on going like that.
- Now click on Next, then set the field-level security and click on Next once more, uncheck all the page layouts and then click Save

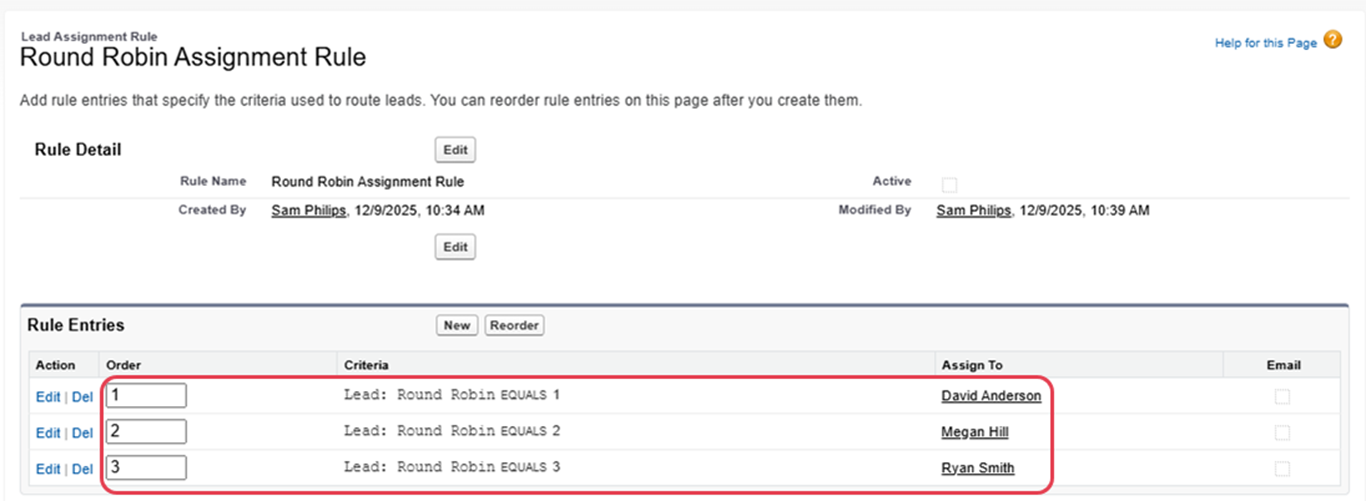
Step 3: Create Lead Assignment Rule
Use your round robin formula field to assign leads to the right person.
- In Setup, search for “Lead Assignment Rules” and open it. Click New, name it “Round Robin Assignment Rule” and click Save. Click to open your new rule.
- In the Rule Entries section, click New.
- Enter 1 for Sort Order.
- Set the rule criteria: choose “Round Robin” in the Field dropdown, “Equals” in the Operator dropdown, 1 in the Value field. Select the first user this rule applies to.
- Optional: select an email template to notify the user about new assignments.
- Repeat this for each user in your rotation. For the second user, enter 2 for Sort Order and Round Robin 2. For the third user, enter 3 for Sort Order and Round Robin 3. Each user gets their own rule entry with their own rotation number.
Critical Limitations of Native Salesforce Round Robin
- Native lead management only works for simple scenarios.
- It’s only for leads and not for cases, accounts, opportunities or custom objects.
- Manual updates require system administrator privileges, so when team members are added or removed it’s a pain.
- It doesn’t support weighted distribution, all team members are treated equally regardless of skill.
- No workload balancing, so leads are unassigned when reps are unavailable or unevenly distributed based on performance.
- Salesforce’s 3,000 assignment rules limit makes it not scalable for larger teams and complex routing.
- Native round robin has no scheduling awareness, leads are assigned continuously without regard to working hours or individual availability.
- These limitations make native only good for small static teams, so we need more flexible specialized tools for larger organizations.
Setting Up Round Robin Salesforce Assignment with Kubaru (Recommended Method)
Kubaru gets rid of all the limitations of native Salesforce round robin and makes it available to business users without admin rights. Setup takes minutes not hours like native implementation.
Why Kubaru for Round Robin
If you want round robin Salesforce assignment that scales without constant admin work? Kubaru makes it easy. Business users can update routing rules themselves, adjust capacity and add team members without waiting on IT, workload based assignment and flexible schedules so you can match distribution to how your team actually works. In short, Kubaru gives you a cleaner, more flexible way to round robin across your CRM.
Step 1: Create Your Round Robin Router
Navigate to the Kubaru application in Salesforce and click the New Router button.
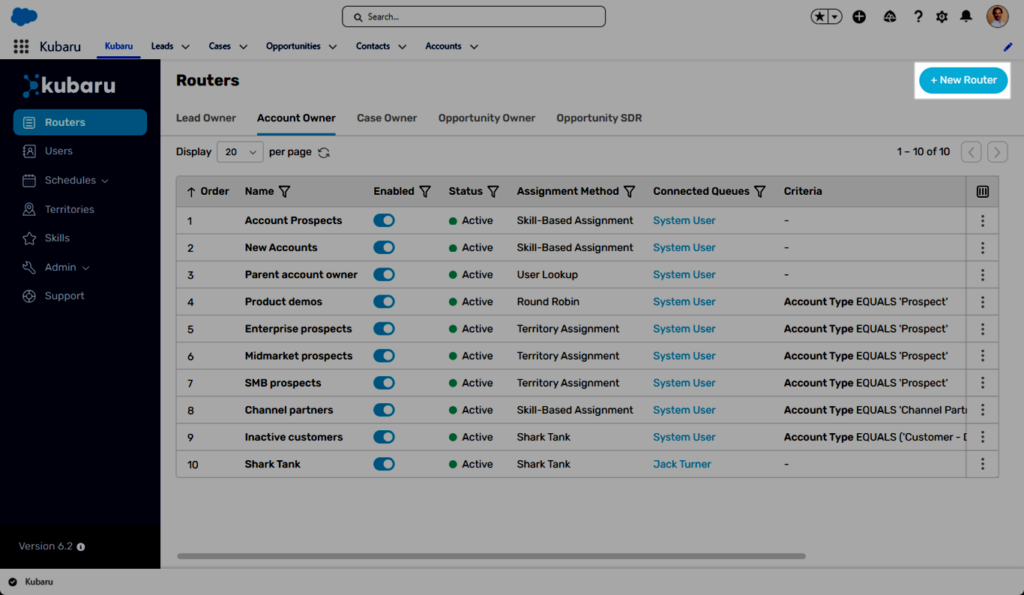
Enter a descriptive name for your router, select the desired Object (e.g., “Lead” or “Case”), and choose the Field to Assign, usually “Owner”. Optionally, adjust the Evaluation Order for multiple routers.
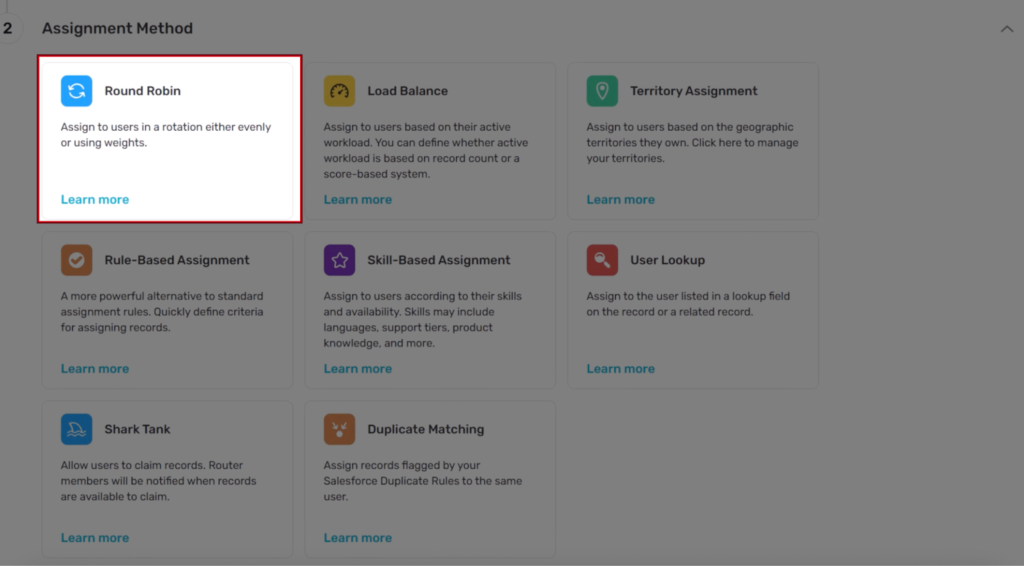
Click Create Router, then select “Round Robin” as the Assignment Method for even distribution of records.
Step 2: Connect a Queue
Routers pull records from Salesforce queues so you need at least one queue set up before you can turn on the router. In What to Assign select an existing queue or create a new one. Queues are just a holding pen for records to be assigned.
If the object doesn’t support queues select users instead through the Connect User(s) picklist. These users don’t need a Kubaru license.
Save to finish setting up the queue.

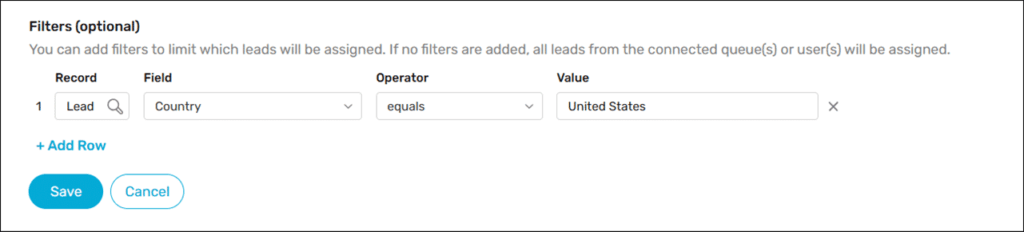
Step 3: Add Distribution Filters (Optional)
Filters let you choose which records from your connected queue get assigned. If you skip them, the router will assign everything in the queue.
Scroll to What to Assign and click Add Row under Filters (optional).
Choose a Field like Country, choose an Operator such as equals, and enter a Value like United States.
Add more rows if you want to layer in additional filters.
You can also set filter logic to decide how the filters work together.
- AND means the record must match every condition.
- OR means it only needs to match one.
- Custom logic lets you mix conditions using something like 1 AND (2 OR 3).
A few examples:
- Lead Source equals “Website”
- Amount greater than 50000
- Status equals “New”
Click Save to apply your filters.
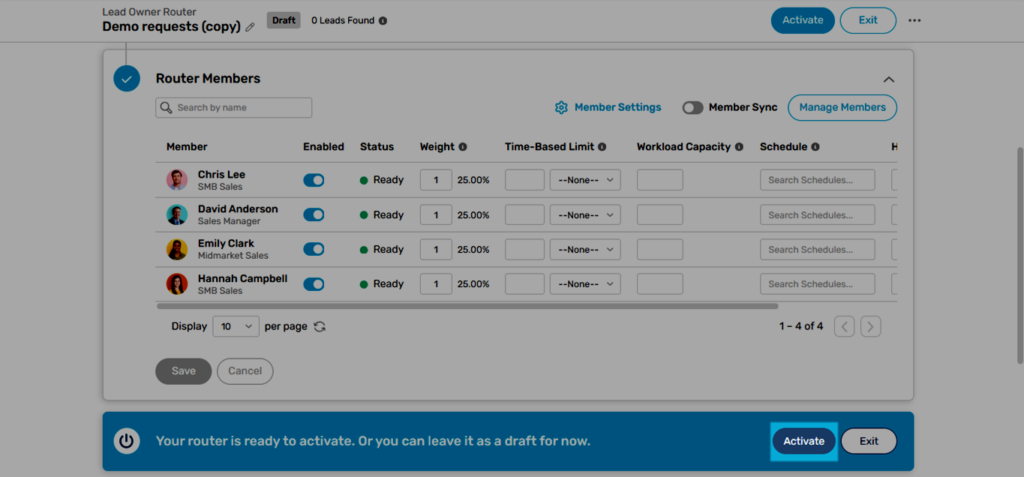
Step 4: Add Router Members
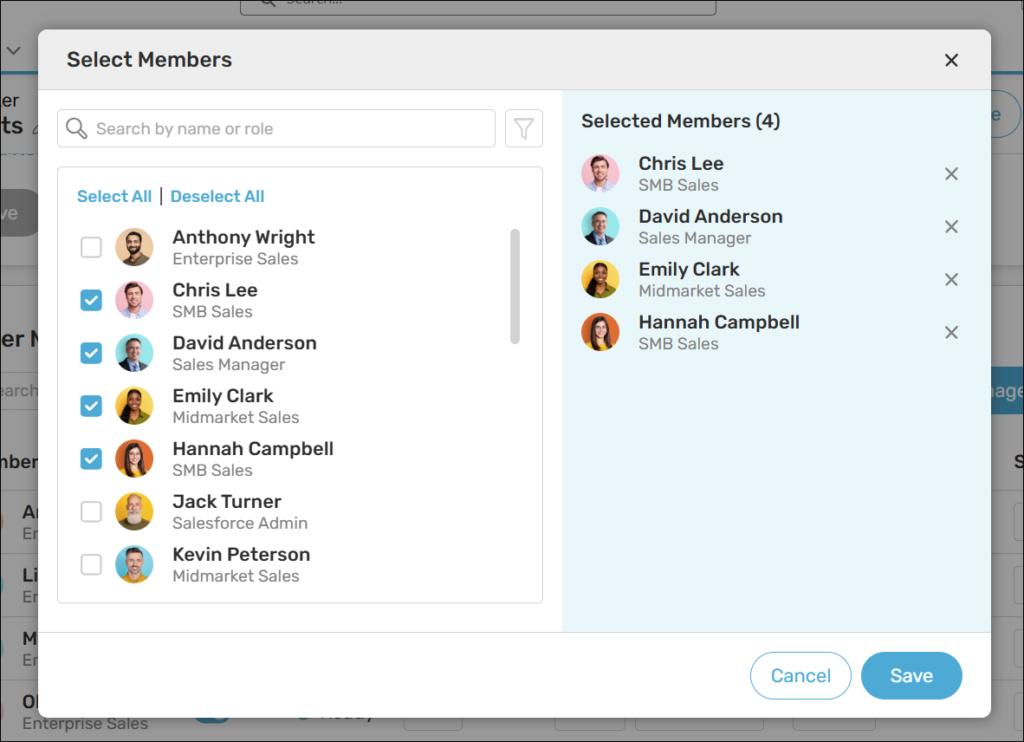
Router members are assigned in a round-robin order. You can either assign users by hand or employ Member Sync to automate this process. To convert the list of users to router members in the Router Members step, highlight the users you’d like added and press Save. If Member Sync is enabled, select a User Field, Operator, and Value to determine who should be considered (such as a role). You can add other filter rows, if necessary. The router will automatically update itself by adding members that match your criteria and removing those that do not. Press Save when you’re finished.
Step 5: Configure Weighted Round Robin (Optional)
Weights let you adjust how often each member receives assignments. Use them when some team members have more capacity than others. In the Router Members section, update the Weight field for each user. The default is 1. If a senior rep should get twice as many records, set their weight to 2.
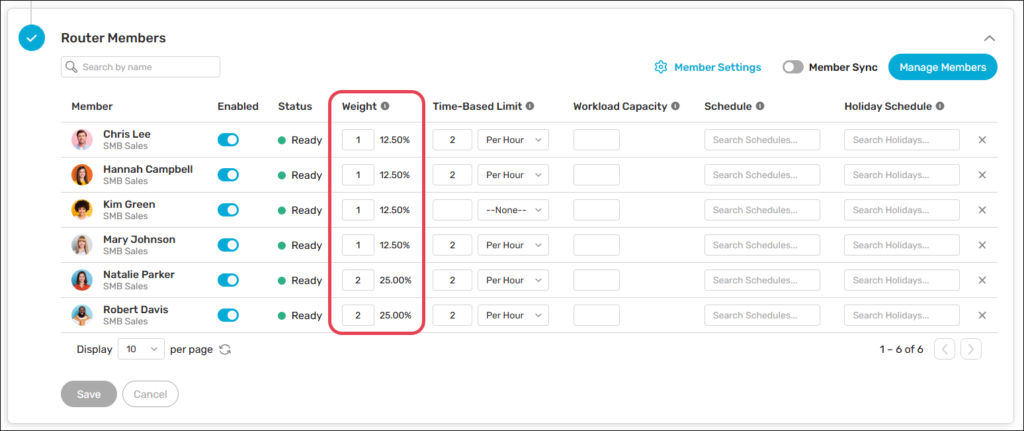
Weighting changes the rotation. With three members (A, B, C), the normal pattern is A-B-C. If A has a weight of 2, the pattern becomes A-B-A-C, giving A twice the volume. You can set any mix of weights to match your team’s needs.
Click Save.
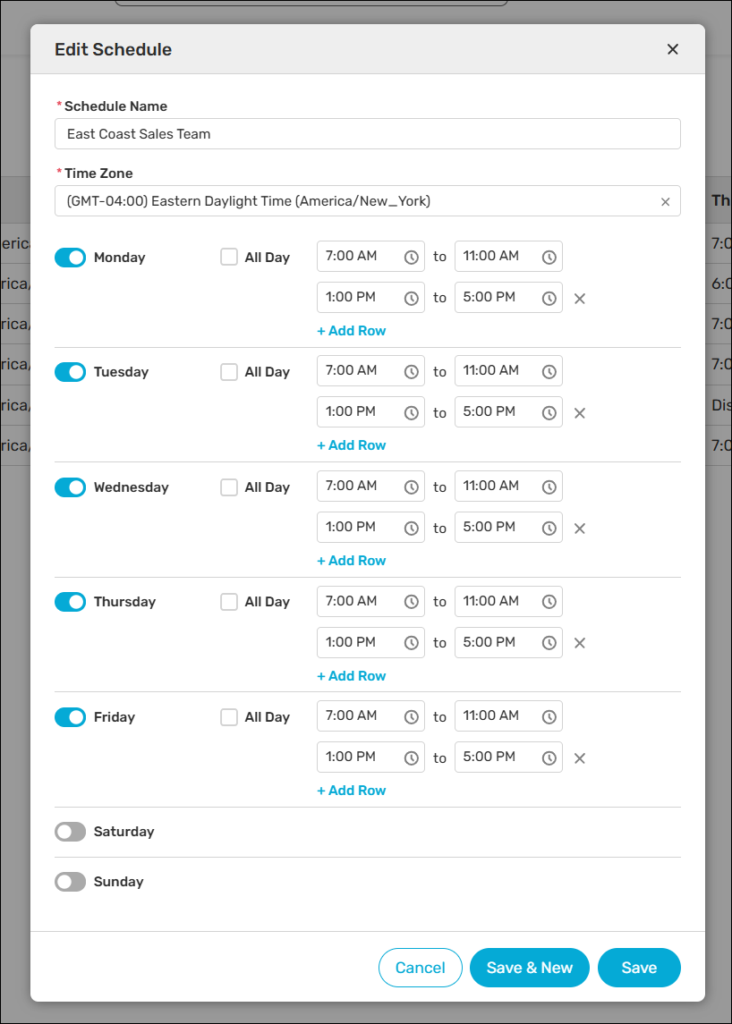
Step 6: Set Distribution Schedule (Optional)
Distribution schedules control when assignments can be made. They let you pause routing outside of business hours or match your team’s work hours.
To create one, go to the Schedules tab, select Distribution, and click New Schedule. Name it, choose a time zone, select your active days, set the hours and save.
To use it, go to your router, Additional Settings, and click Scheduling and Availability. Select your schedule and check Assign During Off-Hours if you want it to count towards SLAs without blocking assignments.
You can also assign schedules to individual members in Router Members which is helpful when your team is across multiple time zones.Click Save to apply.
Step 7: Configure Overflow Behavior
What happens when no one is available to take an assignment? You can choose Continue to send to the next router, Stop to leave in the queue until someone becomes available, or Assign To User/Queue to send to a specific person or queue now. When an overflow happens the log will show “(Overflow)” so you’ll know why the record was routed that way.
Step 8: Activate Your Router
Before you activate the router, click the Assignment Preview link at the top to see which records qualify. If anything looks off, update your filters first. When everything looks right, click Activate to start the round robin.
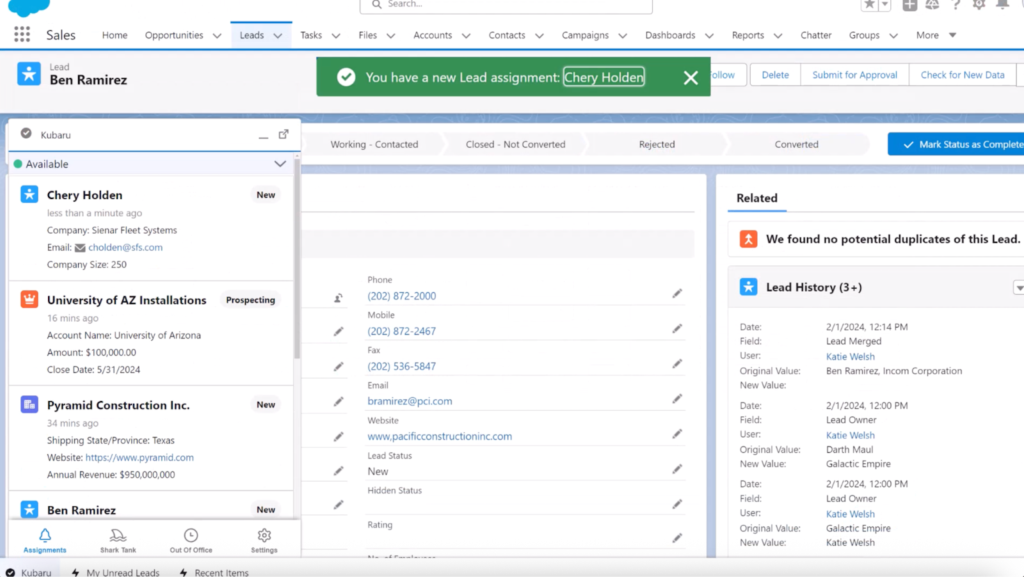
New records will be assigned automatically to your router members and Kubaru will notify users of new assignments.
See Kubaru Round Robin in Action
Round robin only works if it’s consistent, fast and easy to maintain. Salesforce can handle a simple rotation but most teams hit limits quickly — too many objects to support, too many routing rules to manage and too many requests that depend on IT.
Kubaru removes those constraints at an affordable offering. You can assign any object, update routing without admin help and use features like weighting, schedules and overflow logic to match how your team actually works. It gives you a distribution system that stays accurate as headcount, capacity and priorities change.If you want round robin that won’t break every time your team changes, check out how Kubaru does it. Schedule a demo and we’ll walk you through it.