
Salesforce’s original territory management feature was replaced in 2021 with a feature called “Enterprise Territory Management” (or “Territory Management 2.0”). Since then, the name has been shortened to simply “Salesforce Territory Management”.
Salesforce Territory Management is a standard feature that allows companies to organize their accounts and opportunities by geographic territories. In this article we’ll discuss how to use Territory Management as well as some of the limitations of this feature.
What is Salesforce Territory Management?
Salesforce Territory Management helps companies group accounts by region, industry, or any criteria that reflect how they sell. Instead of assigning accounts one by one, you organize them into territories and give the right reps access to each group.
Salesforce’s Enterprise Territory Management (ETM) provides tools to define territories, set rules, and control access.
ETM works well for accounts and opportunities, but it doesn’t route leads automatically. Many teams still rely on manual steps or custom automation to match new leads to the right territory. That’s why growing teams often pair Salesforce territories with routing tools that automate lead assignment and speed up response times.
Benefits of Salesforce Territory Management
- Improved Sales Coverage: Territories ensure that all accounts and leads are assigned to the right sales representatives, reducing the risk of missed opportunities or overlapping efforts.
- Better Visibility and Reporting: Salesforce dashboards and reports filtered by territory allow teams to monitor progress, forecast accurately, and identify high-performing or underperforming territories.
- Enhanced Collaboration: Team members can easily share insights, support each other on opportunities, and maintain continuity in customer relationships even if an account owner is unavailable.
- Scalable Assignment Logic: Assignment rules tied to territories automate the distribution of accounts and leads, reducing manual workload and minimizing human error.
- Alignment with Strategic Initiatives: Territories can be designed to reflect your company’s strategic goals, such as prioritizing named accounts, high-value clients, or specific industries.
How to Enable Enterprise Territory Management
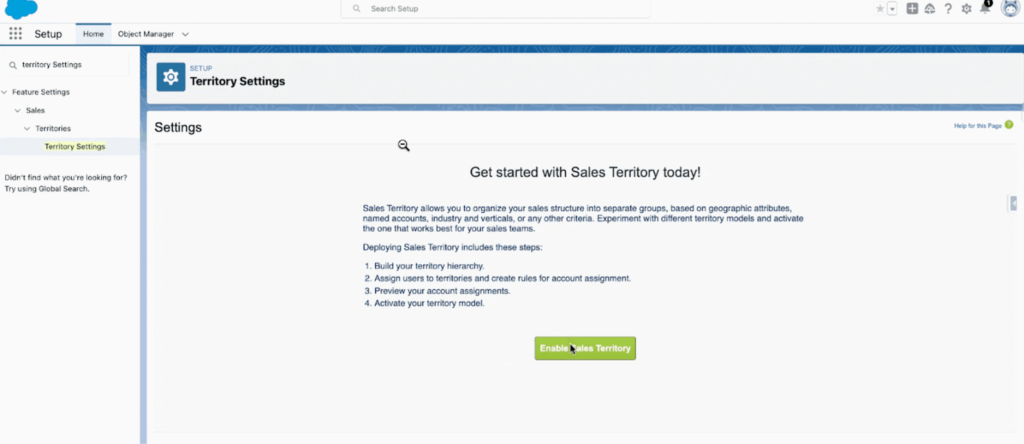
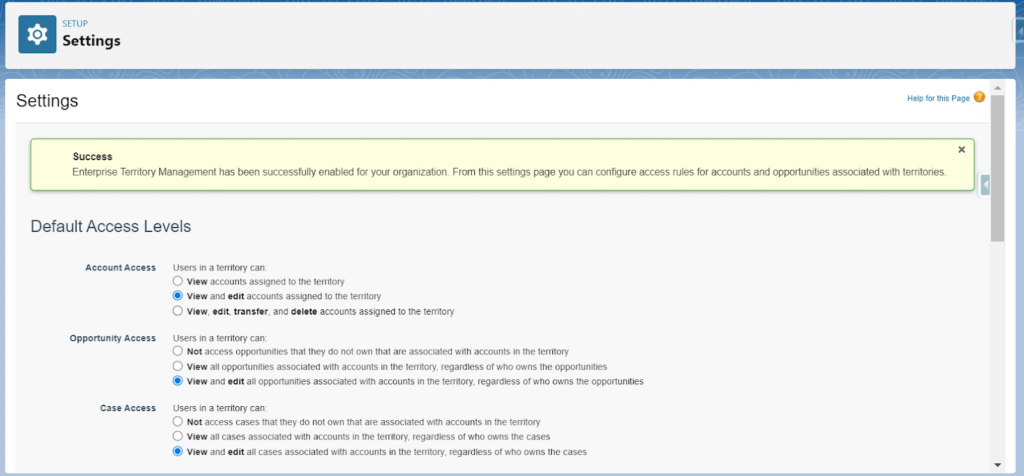
Before you can begin using territories, you must enable the Enterprise Territory Management feature. We recommend testing in a sandbox environment before deploying to production.
Here’s how to do it;
- Navigate to Setup.
- Use the Quick Find search bar to search for “Territory Settings” and click the link.
- Click Enable Enterprise Territory Management.
How to Create Territories
Once you have activated the feature, you can begin creating and managing territories. Here’s how to do it in five steps;
Step 1: Create (or Clone) a Territory Model
- Navigate to Setup.
- Search for “Territory Models” in the Quick Find and click on the link.
- Click the New Territory Model button.
- Give your model a label.
- Click Save.
To clone an existing territory model:
- Navigate to Setup.
- Search for “Territory Models” in the Quick Find and click on the link.
- Click on the label of the model you want to clone.
- Click the Clone button.
- Update the Label and Territory Model Name fields.
- Click Save.
Step 2. Define your territories
Once you have your Territory Model in place, you’re ready to add new territories. Territories are where you will assign users and accounts. You will be able to see all territories under your Territory Model Hierarchy.
You’ll need to create at least one territory type before you can create a territory:
- Navigate to Setup.
- Search for “Territory Types” in the Quick Find and click on the link.
- Click New Territory Type and enter a Label, Territory Type Name, and Priority.
- Click Save.
Follow these steps to create a new territory:
- Navigate to Setup.
- Search for “Territory Models” in the Quick Find and click on the link.
- Click the View Hierarchy link next to the territory model you created.
- Use the dropdown menu in the top right corner to change the view to Tree View. This will display the model’s full territory hierarchy, including existing and child territories.
- Click Create Territory next to the territory model name to create the first territory.
- Fill out the Territory Label, Territory Name, Territory Type, and Parent Territory
- Configure the desired access labels.
- Click Save.
- After you’ve created at least one top-level territory, it will show up in your territory model hierarchy. Then you can add new child territories by clicking Create Territory next to the existing territory name and following the same process.
Step 3. Assign users to each territory
The next step will be to assign users to each territory. Assigning a user to a territory grants them the permissions defined in the Territory Access Levels.
- Navigate to Setup.
- Search for “Territory Models” in the Quick Find and click on the link.
- Click View Hierarchy next to the territory model name.
- Click on the name of the territory you’d like to add members to.
- Scroll down to the Assigned Users related list and click the Manage Users button.
- Select the users you’d like to add from the Available Users table and click Add.
- Save.
Step 4. Create account assignment rules
Assigning accounts is similar to assigning users, but account assignment rules are created at the territory model level, not on individual territories. These rules determine which accounts belong in each territory based on the criteria you define. Once a rule runs, Salesforce places the account into the matching territory or territories.
- Navigate to Setup.
- Search for “Territory Models” in the Quick Find and click on the link.
- Click the View Rules link next to the territory model name.
- Click New Rule.
- Enter a Name and Unique Name (i.e., API name) for your rule.
- Define your selection criteria. This is what determines which accounts are assigned to your territory.
- (Optional) Check Apply to child territories.
- Check the Active checkbox if you want the rule to run automatically when a user creates or updates an account.
- Click Save.
You can run assignment rules for existing accounts by following these steps:
- Navigate to Setup.
- Search for “Territory Models” in the Quick Find and click on the link.
- Click View Hierarchy next to the territory model name.
- Click the Run Assignment Rules button at the top of the page. Note: you can also click Run Rules next to a particular territory to run rules for only that territory instead.
- In the modal, select to either “Include all accounts” or “Include a subset of accounts”.
- Click Run Rules.
Step 5. Activate your territory model
Salesforce only allows you to have one active territory model at a time.
Once you’re satisfied with your territory model and user and account assignments, you’re ready to activate it:
- Navigate to Setup.
- Search for “Territory Models” in the Quick Find and click on the link
- Click View Hierarchy next to the territory model name.
- Click the Activate button.
- In the modal, click Activate.
That’s it! Now, Salesforce will display “Activating” while it processes your request. This may take some time, depending on the size and complexity of your model. Watch for an email from Salesforce that confirms your model’s activation.
How to Assign Leads Based on Territories
Salesforce Territory Management only applies to accounts and opportunities, not leads. This means you can’t assign leads directly through a territory model. Instead, you assign leads by using territory data as criteria inside Lead Assignment Rules or automation. The goal is to mimic your territory structure so new leads reach the right reps fast.
Here’s how to do it:
- Create Territory Fields on Leads
- Add fields such as Region, State, Postal Code, or Country. These fields act as your “territory indicators” because Salesforce won’t pull territory access rules into lead routing on its own. Tools like Kubaru can then use these fields to assign leads instantly based on your territory logic.
- Build Assignment Rules Using Territory Criteria
- Go to Setup → Lead Assignment Rules.
- Create rule entries that match your territory definitions. For example:
- State = “CA, OR, WA” → assign to West Coast queue
- Country = “UK” → assign to EMEA team
- Postal Code starts with “9” → assign to a specific rep
- Assign Leads to the Right Users or Queues:
- Because territories can include several reps, most teams route leads into a queue for each territory. Reps pull from that queue, or you can apply round-robin logic to distribute evenly.
- Test Your Routing
- Create test leads for each region or segment.
- Check that they land in the correct queue or with the right owner.
- Adjust rule order if Salesforce fires the wrong rule first.
- Monitor and Refine Over Time
- Use Lead reports to watch how leads spread across your territories.
- Fix coverage gaps, update criteria when territories change, and rebalance workloads as your team grows.
Limitations of Salesforce Territory Management
Like many standard features, Territory Management isn’t a one-size-fits-all solution. Here are some of the limitations you may face:
- Limited object compatibility. Territory Management is only compatible with the Account and Lead objects.
- No owner assignment: Territory Management does not assign record ownership to leads or accounts—it only grants access based on territory membership. To automate owner assignment, you’ll need to use tools like Flow, Apex, or third-party apps.
- Salesforce admin permissions required. Many features of Territory Management require Salesforce admin permissions, which can be a serious stumbling block for organizations that want to delegate this responsibility to business users.
- Limits on territories, assignment rules, and territory models. Salesforce limits the number of active territories, models, and rules you can have at one time. These limits differ based on your Salesforce edition. See Salesforce’s article on Allocations and Considerations for Territories for more information.
- Working with Apex code. Certain operations—like assigning territories to opportunities based on multiple filters—require customizing or writing Apex code, something not everyone is familiar or comfortable with.
How Kubaru Enhances Salesforce Territory Management
Kubaru complements Salesforce by providing advanced territory and skill-based routing capabilities that overcome native limitations.
Here’s how Kubaru helps:
- Automated Ownership Assignment: Kubaru can automatically assign both accounts and leads to users within a territory, removing the need for custom flows or Apex.
- Multi-Object Support: Unlike Salesforce’s limited object compatibility, Kubaru supports leads, cases, opportunities, and custom objects for routing.
- Dynamic Workload Balancing: Kubaru ensures equitable distribution of records based on user capacity and performance, preventing overload.
- Advanced Rules and Logic: It allows complex conditional routing based on multiple fields, skill levels, and account attributes.
- Detailed Analytics and Reporting: Kubaru provides transparent logs and dashboards showing how records are assigned, enabling managers to identify bottlenecks and optimize performance.
- Simplified Administration: With an intuitive interface, Kubaru reduces administrative complexity, making it easier to scale routing operations across large teams.
By addressing the pain points of Salesforce Territory Management, Kubaru ensures more accurate assignments, improved team productivity, and a better customer experience.
Best Practices for Salesforce Territory Management
Plan Your Territories Carefully
Start by shaping territories around geography, account type, revenue, and workload so they feel balanced and logical. Try not to create too many small territories because they quickly become hard to manage and rarely add real value.
Use Hierarchies Strategically
A clear parent and child structure makes coverage easier to organize and reporting much cleaner. When your hierarchy reflects how your sales team actually works, it becomes much simpler to adjust as your strategy evolves.
Automate Where Possible
Use assignment rules and flows to reduce manual work and keep assignments consistent. Automation minimizes errors and helps your team work more efficiently as the business grows.
Regularly Review Performance
Make it a habit to check whether territories, workloads, and results still make sense. These regular reviews help you spot imbalances early and keep your coverage model running smoothly.
Test New Models in Sandbox
Before activating any changes in production, test them in a sandbox or planning model. This ensures your updates work as intended without disrupting your active sales team.
Document Processes
Keep clear documentation of rules, territory structures, and access levels. This saves time when onboarding new team members and makes troubleshooting much easier in the future.
Territory Management Terms to Know
| Term | Definition |
|---|---|
| Territory | Territories are used to segment Accounts and/or Leads by geography, industry, and other criteria. Territories can be owned by one or more user. |
| Territory Model | Territories are always part of a territory model. Each territory model includes a territory hierarchy that depicts the parent/child relationships between your territories. You can only have one active territory model at a time. However, you can build and keep additional models in a planning or archived state for testing, comparison, or future reference. |
| Territory Type | Territory types are used to group territories together for organizational purposes. For example, you might create a “Named Accounts” territory type that includes all of your named account territories. |
| Territory Type Priority | This is one of the most misunderstood settings in Enterprise Territory Management. Territory Type Priority is useful mostly when using Apex to assign territories. This numeric field helps ensure that territories are evaluated in the appropriate order. If you’re not using Apex to programmatically assign territories, you can disregard this field. See the Sales Territories Implementation Guide for more information on using Apex to assign territories based on the priority field. |
| Assignment Rules | Assignment rules are used to associate Accounts with territories. You can associate one or more assignment rules with each territory. Each assignment rule contains one or more filter conditions. For example, you might create a territory labeled “Canada” and associate an assignment rule with the criteria “Account: Shipping Country equals Canada”. |
Territory Management FAQs
Is Salesforce Enterprise Territory Management free?
Yes, Territory Management is included at no additional cost with compatible Salesforce editions.
Which editions of Salesforce are compatible with Enterprise Territory Management?
ETM is compatible with Performance and Developer editions and in Enterprise and Unlimited editions with Sales Cloud.
In what order are territories evaluated?
The territory model hierarchy determines the order in which territories are evaluated. Child territories are always evaluated before parents. For example, let’s say you have separate territories for Ontario and Canada. You would want to make the Ontario territory a child territory of Canada to ensure it’s evaluated first.
In addition, when creating account assignment rules, you can select an “Apply to Child Territories” checkbox. This allows you to apply general rules to Canada and its child territories like Ontario.
How do I reassign a territory (and associated records) to a new owner?
If you need to reassign a territory to a new owner, simply add them as a new user. After adding them, you will see them in the Assigned Users section. Then, run the assignment rules again to assign accounts and records to the new owner.
When should you enable “Apply to child territories”?
When creating assignment rules, you have the option to enable “Apply to child territories”. If checked, the criteria you’ve defined will automatically be applied to any child territories. This can save time by eliminating the need to define redundant criteria for each child territory.
For example, let’s say you create a parent territory for “United States Manufacturing” that includes criteria for “Account: Shipping Country equals United States” and “Account: Industry equals Manufacturing”. Next, you create child territories for each State (e.g., “Oregon Manufacturing”). If we checked “Apply to child territories” in the parent territory, we’ll only need to enter “Account: Shipping State/Province equals Oregon” for our child territory.
Are there limits on the number of territories you can create with Enterprise Territory Management?
Salesforce has a limit of 1,000 territories per territory model for the Developer and Enterprise editions. If using the Performance or Unlimited editions, you may request up to an additional 20,000 territories from Salesforce Customer Support.
What is Salesforce Maps?
Salesforce Maps is a paid add-on feature that allows customers to visualize Salesforce data on interactive maps. This can be useful for route planning, scheduling, territory balancing, and more.
What is Salesforce Territory Planning?
Territory Planning is part of the Sales Planning add-on feature for Salesforce Maps. This feature provides advanced capabilities for balancing territories amongst your sales team.
What’s the best alternative to Salesforce Enterprise Territory Management?
Kubaru is a native Salesforce application that provides powerful territory management features without the limitations of Enterprise Territory Management.
Looking For a Better Solution?
You may find in the setup process that Salesforce Territory Management doesn’t align with your company’s needs. Luckily, there are better solutions. Kubaru provides all of the features of territory management with none of the limitations. Interested in giving Kubaru a try? You can contact us to schedule a personalized demo or start a free trial today.